

Authorized by AI Technology Camp (ID: rgznai100)
Author: Liu Ziying
This article is about 1300 words, recommended reading 6 minutes.
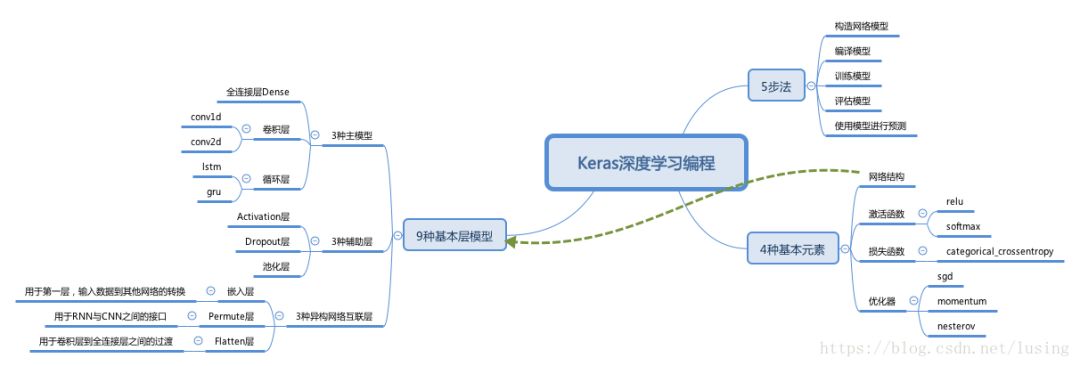
This article teaches you how to develop deep learning models using 5 steps + 4 basic elements + 9 basic layer structures.

As a programmer, we can learn deep learning model development just like learning programming. We use Keras as an example to illustrate.We can summarize with 5 steps + 4 basic elements + 9 basic layer structures, the 5-4-9 model.
Let’s understand their relationships through an image:
Click to view the large image
5 Steps:
Construct the network model
Compile the model
Train the model
Evaluate the model
Use the model for prediction
4 Basic Elements:
Network Structure: Composed of 10 basic layer structures and other layer structures
Activation Functions: such as relu, softmax. Mnemonic: use softmax for the last output, and generally use relu for others
Loss Functions:
categorical_crossentropy multi-class logarithmic loss
binary_crossentropy logarithmic loss
mean_squared_error mean squared error
mean_absolute_error mean absolute error
Optimizers: such as SGD stochastic gradient descent, RMSProp, Adagrad, Adam, Adadelta, etc.
9 Basic Layer Models:
3 Main Models:
Fully Connected Layer Dense
Convolutional Layer: such as conv1d, conv2d
Recurrent Layer: such as lstm, gru
3 Auxiliary Layers:
Activation Layer
Dropout Layer
Pooling Layer
3 Heterogeneous Network Interconnection Layers:
Embedding Layer: Used for the first layer, converting input data to other networks
Flatten Layer: Used for the transition between convolutional layers and fully connected layers
Permute Layer: Used for the interface between RNN and CNN
Five Steps Method
The Five Steps Method consists of five steps to solve problems using deep learning:
-
Construct the network model
-
Compile the model
-
Train the model
-
Evaluate the model
-
Use the model for prediction
Among these five steps, the key step is mainly the first one. Once this step is determined, the subsequent parameters can be set based on it.
1. Procedural Method to Construct the Network Model
We first learn the easiest to understand, the process of constructing a network model using the procedural method.
Keras provides the Sequential container to implement procedural construction. You just need to use the add method of Sequential to add layer structures. We will detail the 10 basic layer structures later.
Example:
from keras.models import Sequential
from keras.layers import Dense, Activation

model = Sequential()

model.add(Dense(units=64, input_dim=100))
model.add(Activation("relu"))
model.add(Dense(units=10))
model.add(Activation("softmax"))
For what kind of problem to construct what kind of layer structure, we will introduce in the examples later.
2. Compile the Model
After constructing the model, the next step is to call the compile method of Sequential to compile it.
model.compile(loss='categorical_crossentropy', optimizer='sgd', metrics=['accuracy'])
When compiling, you need to specify two basic elements: loss is the loss function, optimizer is the optimization function.
If you only want to use the most basic functionality, you can just specify the name of the string. If you want to configure more parameters, call the corresponding class to generate the object. For example: if we want to add Nesterov momentum to stochastic gradient descent, just generate an SGD object:
from keras.optimizers import SGD
model.compile(loss='categorical_crossentropy', optimizer=SGD(lr=0.01, momentum=0.9, nesterov=True))
lr is the learning rate.
3. Train the Model
Call the fit function, set the output values X, the labeled values y, the number of epochs, and the batch size:
model.fit(x_train, y_train, epochs=5, batch_size=32)
4. Evaluate the Model
To see how well the model is trained, you need to evaluate it using test data:
loss_and_metrics = model.evaluate(x_test, y_test, batch_size=128)
5. Use the Model for Prediction
The purpose of all training is for prediction:
classes = model.predict(x_test, batch_size=128)
4 Basic Elements
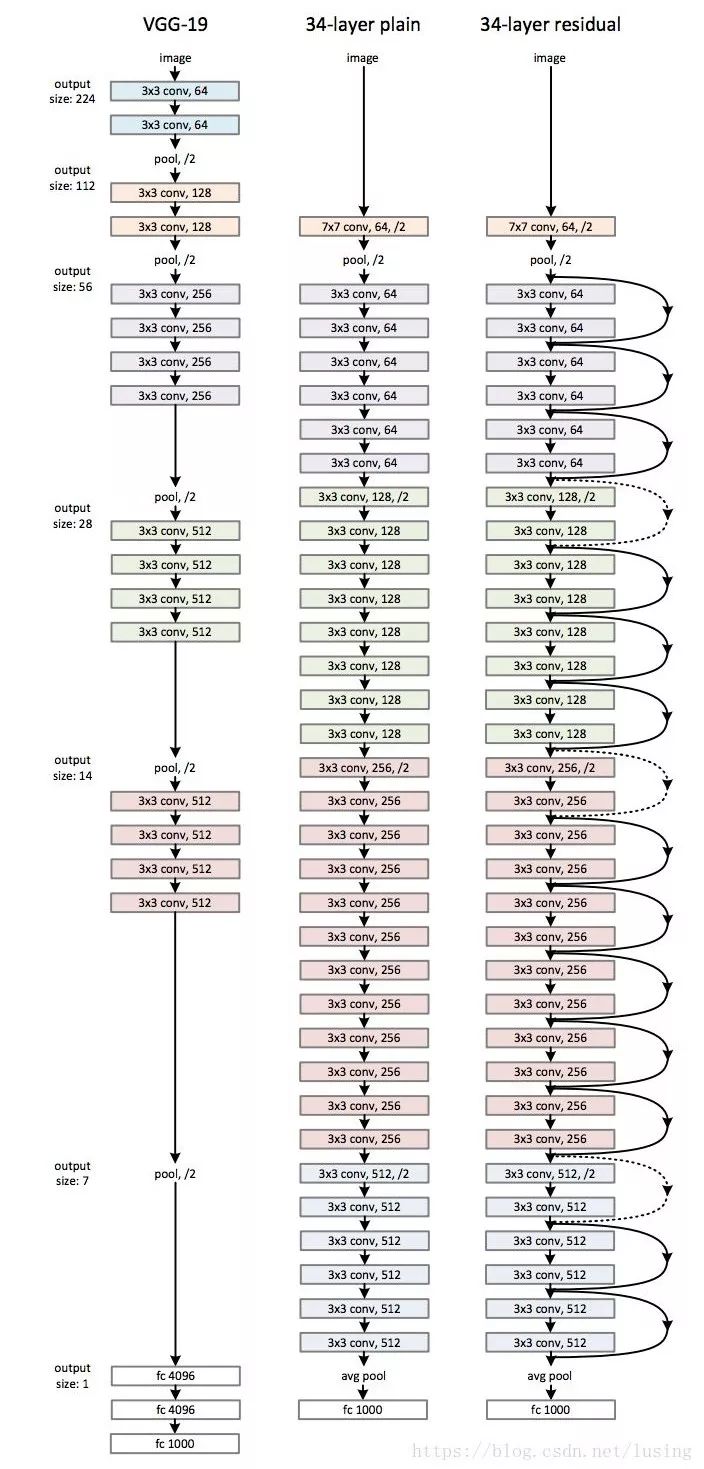
1. Network Structure
Mainly assembled with the following layer structures. How to design the network structure? You can refer to papers, for example, in this paper, whether it is the 19-layer VGG-19 on the left or the 34-layer ResNet on the right, just implement it according to the diagram.
2. Activation Functions
-
For multi-class situations, the last layer is softmax.
-
Other deep learning layers mostly use relu.
-
Binary classification can use sigmoid.
-
Additionally, shallow neural networks can also use tanh.
3. Loss Functions
-
categorical_crossentropy: multi-class logarithmic loss
-
binary_crossentropy: logarithmic loss
-
mean_squared_error: mean squared error
-
mean_absolute_error: mean absolute error
For multi-class, mainly use categorical_crossentropy.
4. Optimizers
-
SGD: stochastic gradient descent
-
Adagrad: Adaptive Gradient descent
-
Adadelta: further improvement of Adagrad
-
RMSProp
-
Adam
This article will focus on introducing the last two tutorials.
Functional Programming in Deep Learning
The various basic layers introduced earlier, in addition to being added to the Sequential container in series, are also callable objects. After being called, they still return callable objects. Therefore, they can be regarded as functions and linked through calling.
Here’s an official example:
from keras.layers import Input, Dense
from keras.models import Model

inputs = Input(shape=(784,))

x = Dense(64, activation='relu')(inputs)
x = Dense(64, activation='relu')(x)
predictions = Dense(10, activation='softmax')(x)

model = Model(inputs=inputs, outputs=predictions)
model.compile(optimizer='rmsprop',
              loss='categorical_crossentropy',
              metrics=['accuracy'])
model.fit(data, labels)
Why Use Functional Programming?
The answer is that complex network structures are not all linear and added into containers. There are parallel and reusable situations. This is when the advantages of callable come into play.
For example, the Google Inception model below is parallel:
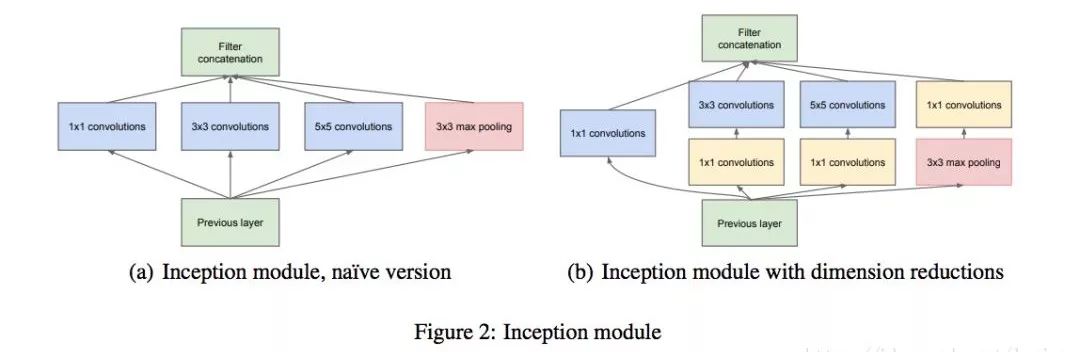
Our code naturally corresponds to parallel by using parallel, where an input input_img is reused by three models:
from keras.layers import Conv2D, MaxPooling2D, Input

input_img = Input(shape=(256, 256, 3))

tower_1 = Conv2D(64, (1, 1), padding='same', activation='relu')(input_img)
tower_1 = Conv2D(64, (3, 3), padding='same', activation='relu')(tower_1)

tower_2 = Conv2D(64, (1, 1), padding='same', activation='relu')(input_img)
tower_2 = Conv2D(64, (5, 5), padding='same', activation='relu')(tower_2)

tower_3 = MaxPooling2D((3, 3), strides=(1, 1), padding='same')(input_img)
tower_3 = Conv2D(64, (1, 1), padding='same', activation='relu')(tower_3)

output = keras.layers.concatenate([tower_1, tower_2, tower_3], axis=1)
Case Tutorial
1. CNN for MNIST Handwriting Recognition
Just talking without practice is just a show. Let’s look at an example of processing MNIST that conforms to the Five Steps Method. First, let’s analyze the core model code, as the model is linear, we still use the Sequential container:
model = Sequential()
The core consists of two convolutional layers:
model.add(Conv2D(32, kernel_size=(3, 3),
                 activation='relu',
                 input_shape=input_shape))
model.add(Conv2D(64, (3, 3), activation='relu'))
To prevent overfitting, we add a max pooling layer, followed by a Dropout layer:
model.add(MaxPooling2D(pool_size=(2, 2)))
model.add(Dropout(0.25))
Next, we need a Flatten layer to transition to the fully connected layer:
model.add(Flatten())
Next is the fully connected layer, with the activation function being relu. Still worried about overfitting, let’s add another Dropout layer!
model.add(Dense(128, activation='relu'))
model.add(Dropout(0.5))
Finally, output through a fully connected network with a softmax activation function:
model.add(Dense(num_classes, activation='softmax'))
Next, compile this model, with the loss function being categorical_crossentropy multi-class logarithmic loss function, and the optimizer selected as Adadelta.
model.compile(loss=keras.losses.categorical_crossentropy,
              optimizer=keras.optimizers.Adadelta(),
              metrics=['accuracy'])
Next is the complete runnable code:
from __future__ import print_function
import keras
from keras.datasets import mnist
from keras.models import Sequential
from keras.layers import Dense, Dropout, Flatten
from keras.layers import Conv2D, MaxPooling2D
from keras import backend as K

batch_size = 128
num_classes = 10
epochs = 12


# input image dimensions
img_rows, img_cols = 28, 28


# the data, split between train and test sets
(x_train, y_train), (x_test, y_test) = mnist.load_data()

if K.image_data_format() == 'channels_first':
    x_train = x_train.reshape(x_train.shape[0], 1, img_rows, img_cols)
    x_test = x_test.reshape(x_test.shape[0], 1, img_rows, img_cols)
    input_shape = (1, img_rows, img_cols)
else:
    x_train = x_train.reshape(x_train.shape[0], img_rows, img_cols, 1)
    x_test = x_test.reshape(x_test.shape[0], img_rows, img_cols, 1)
    input_shape = (img_rows, img_cols, 1)

x_train = x_train.astype('float32')
x_test = x_test.astype('float32')
x_train /= 255
x_test /= 255
print('x_train shape:', x_train.shape)
print(x_train.shape[0], 'train samples')
print(x_test.shape[0], 'test samples')

# convert class vectors to binary class matrices
y_train = keras.utils.to_categorical(y_train, num_classes)
y_test = keras.utils.to_categorical(y_test, num_classes)

model = Sequential()
model.add(Conv2D(32, kernel_size=(3, 3),
                 activation='relu',
                 input_shape=input_shape))
model.add(Conv2D(64, (3, 3), activation='relu'))
model.add(MaxPooling2D(pool_size=(2, 2)))
model.add(Dropout(0.25))
model.add(Flatten())
model.add(Dense(128, activation='relu'))
model.add(Dropout(0.5))
model.add(Dense(num_classes, activation='softmax'))

model.compile(loss=keras.losses.categorical_crossentropy,
              optimizer=keras.optimizers.Adadelta(),
              metrics=['accuracy'])
model.fit(x_train, y_train,
          batch_size=batch_size,
          epochs=epochs,
          verbose=1,
          validation_data=(x_test, y_test))
score = model.evaluate(x_test, y_test, verbose=0)
print('Test loss:', score[0])
print('Test accuracy:', score[1])
Next, let’s have a surprise example, processing translations between various languages.
2. Machine Translation: Multilingual Translation
Translating between English and Chinese, has it troubled you since your student days? Now you don’t have to worry, as long as there is a reference table for two languages, we can train a model to perform machine translation.
First, download a dictionary:
http://www.manythings.org/anki/
Then we still use the old method, let’s first look at the core code. There’s nothing to say, this type of serialization processing problem must use RNN, usually with LSTM.
encoder_inputs = Input(shape=(None, num_encoder_tokens))
encoder = LSTM(latent_dim, return_state=True)
encoder_outputs, state_h, state_c = encoder(encoder_inputs)
encoder_states = [state_h, state_c]
decoder_inputs = Input(shape=(None, num_decoder_tokens))
decoder_lstm = LSTM(latent_dim, return_sequences=True, return_state=True)
decoder_outputs, _, _ = decoder_lstm(decoder_inputs,
                                     initial_state=encoder_states)
decoder_dense = Dense(num_decoder_tokens, activation='softmax')
decoder_outputs = decoder_dense(decoder_outputs)
model = Model([encoder_inputs, decoder_inputs], decoder_outputs)
The optimizer uses rmsprop, and the loss function is still categorical_crossentropy.validation_split is used to randomly split a set into training and testing sets.
# Run training
model.compile(optimizer='rmsprop', loss='categorical_crossentropy')
model.fit([encoder_input_data, decoder_input_data], decoder_target_data,
          batch_size=batch_size,
          epochs=epochs,
          validation_split=0.2)
Finally, training a model is not easy, we will store it.
model.save('s2s.h5')
Lastly, here’s the complete code that implements machine translation, with comments and blank lines totaling over 100 lines, available for those who need it.
from __future__ import print_function

from keras.models import Model
from keras.layers import Input, LSTM, Dense
import numpy as np

batch_size = 64  # Batch size for training.
epochs = 100  # Number of epochs to train for.
latent_dim = 256  # Latent dimensionality of the encoding space.
num_samples = 10000  # Number of samples to train on.
# Path to the data txt file on disk.
data_path = 'fra-eng/fra.txt'

# Vectorize the data.
input_texts = []
target_texts = []
input_characters = set()
target_characters = set()
with open(data_path, 'r', encoding='utf-8') as f:
    lines = f.read().split('\n')
for line in lines[: min(num_samples, len(lines) - 1)]:
    input_text, target_text = line.split('\t')
    # We use "tab" as the "start sequence" character
    # for the targets, and "\n" as "end sequence" character.
    target_text = '\t' + target_text + '\n'
    input_texts.append(input_text)
    target_texts.append(target_text)
    for char in input_text:
        if char not in input_characters:
            input_characters.add(char)
    for char in target_text:
        if char not in target_characters:
            target_characters.add(char)

input_characters = sorted(list(input_characters))
target_characters = sorted(list(target_characters))
num_encoder_tokens = len(input_characters)
num_decoder_tokens = len(target_characters)
max_encoder_seq_length = max([len(txt) for txt in input_texts])
max_decoder_seq_length = max([len(txt) for txt in target_texts])

print('Number of samples:', len(input_texts))
print('Number of unique input tokens:', num_encoder_tokens)
print('Number of unique output tokens:', num_decoder_tokens)
print('Max sequence length for inputs:', max_encoder_seq_length)
print('Max sequence length for outputs:', max_decoder_seq_length)

input_token_index = dict(
    [(char, i) for i, char in enumerate(input_characters)])
target_token_index = dict(
    [(char, i) for i, char in enumerate(target_characters)])

encoder_input_data = np.zeros(
    (len(input_texts), max_encoder_seq_length, num_encoder_tokens),
    dtype='float32')
decoder_input_data = np.zeros(
    (len(input_texts), max_decoder_seq_length, num_decoder_tokens),
    dtype='float32')
decoder_target_data = np.zeros(
    (len(input_texts), max_decoder_seq_length, num_decoder_tokens),
    dtype='float32')

for i, (input_text, target_text) in enumerate(zip(input_texts, target_texts)):
    for t, char in enumerate(input_text):
        encoder_input_data[i, t, input_token_index[char]] = 1.
    for t, char in enumerate(target_text):
        # decoder_target_data is ahead of decoder_input_data by one timestep
        decoder_input_data[i, t, target_token_index[char]] = 1.
        if t > 0:
            # decoder_target_data will be ahead by one timestep
            # and will not include the start character.
            decoder_target_data[i, t - 1, target_token_index[char]] = 1.

# Define an input sequence and process it.
encoder_inputs = Input(shape=(None, num_encoder_tokens))
encoder = LSTM(latent_dim, return_state=True)
encoder_outputs, state_h, state_c = encoder(encoder_inputs)
# We discard `encoder_outputs` and only keep the states.
encoder_states = [state_h, state_c]

# Set up the decoder, using `encoder_states` as initial state.
decoder_inputs = Input(shape=(None, num_decoder_tokens))
# We set up our decoder to return full output sequences,
# and to return internal states as well. We don't use the
# return states in the training model, but we will use them in inference.
decoder_lstm = LSTM(latent_dim, return_sequences=True, return_state=True)
decoder_outputs, _, _ = decoder_lstm(
    decoder_inputs, initial_state=encoder_states)
decoder_dense = Dense(num_decoder_tokens, activation='softmax')
decoder_outputs = decoder_dense(decoder_outputs)

# Define the model that will turn
# `encoder_input_data` & `decoder_input_data` into `decoder_target_data`
model = Model([encoder_inputs, decoder_inputs], decoder_outputs)

# Run training
model.compile(optimizer='rmsprop', loss='categorical_crossentropy')
model.fit([encoder_input_data, decoder_input_data], decoder_target_data,
          batch_size=batch_size,
          epochs=epochs,
          validation_split=0.2)
# Save model
model.save('s2s.h5')

encoder_model = Model(encoder_inputs, encoder_states)

decoder_state_input_h = Input(shape=(latent_dim,))
decoder_state_input_c = Input(shape=(latent_dim,))
decoder_states_inputs = [decoder_state_input_h, decoder_state_input_c]
decoder_outputs, state_h, state_c = decoder_lstm(
    decoder_inputs, initial_state=decoder_states_inputs)
decoder_states = [state_h, state_c]
decoder_outputs = decoder_dense(decoder_outputs)
decoder_model = Model(
    [decoder_inputs] + decoder_states_inputs,
    [decoder_outputs] + decoder_states)

# Reverse-lookup token index to decode sequences back to
# something readable.
reverse_input_char_index = dict(
    (i, char) for char, i in input_token_index.items())
reverse_target_char_index = dict(
    (i, char) for char, i in target_token_index.items())


def decode_sequence(input_seq):
    # Encode the input as state vectors.
    states_value = encoder_model.predict(input_seq)

    # Generate empty target sequence of length 1.
    target_seq = np.zeros((1, 1, num_decoder_tokens))
    # Populate the first character of target sequence with the start character.
    target_seq[0, 0, target_token_index['\t']] = 1.

    # Sampling loop for a batch of sequences
    # (to simplify, here we assume a batch of size 1).
    stop_condition = False
    decoded_sentence = ''
    while not stop_condition:
        output_tokens, h, c = decoder_model.predict(
            [target_seq] + states_value)

        # Sample a token
        sampled_token_index = np.argmax(output_tokens[0, -1, :])
        sampled_char = reverse_target_char_index[sampled_token_index]
        decoded_sentence += sampled_char

        # Exit condition: either hit max length
        # or find stop character.
        if (sampled_char == '\n' or
           len(decoded_sentence) > max_decoder_seq_length):
            stop_condition = True

        # Update the target sequence (of length 1).
        target_seq = np.zeros((1, 1, num_decoder_tokens))
        target_seq[0, 0, sampled_token_index] = 1.

        # Update states
        states_value = [h, c]

    return decoded_sentence


for seq_index in range(100):
    # Take one sequence (part of the training set)
    # for trying out decoding.
    input_seq = encoder_input_data[seq_index: seq_index + 1]
    decoded_sentence = decode_sequence(input_seq)
    print('-')
    print('Input sentence:', input_texts[seq_index])
    print('Decoded sentence:', decoded_sentence)
Author Profile
Liu Ziying, Alibaba Operating System Framework Expert; CSDN Blog Expert. With over ten years of experience, has maintained a strong interest in mathematics and artificial intelligence algorithms, new programming languages, new development methods, etc. Enjoys promoting new technology progress through technical sharing.
Author’s Blog
https://blog.csdn.net/lusing/article/details/8057327