Click on the above“Beginner’s Guide to Vision” to selectStar or “Pin”
Important content delivered promptly
This article is adapted from | OpenCV Academy
Introduction to FaceNet Network
FaceNet is a face recognition model proposed by Google, and its biggest difference from other face recognition models is that it does not output an intermediate layer, but directly embeds and generates face features in a low-dimensional Euclidean space. This is very convenient for various recognition, classification, and similarity comparison in the future. Compared to other deep learning methods, FaceNet only needs 128 bytes to represent a face. The design goal tasks of the FaceNet network are as follows:
1. Verification - Check if it is the same face
2. Recognition - Identify if it is the same person
3. Clustering - Discover people with similar face characteristics
The explanation of what neural network embedding is quite complex, simply put, embedding learning in neural networks helps us represent discrete variables as continuous vectors, finding nearest neighbors in low-dimensional space. The word2vec in TensorFlow uses embedding. Once the embedding neural network is trained, the target tasks become very simple:
Face verification - becomes a similarity comparison problem
Face recognition - becomes a KNN classification problem
Face clustering - can be completed through K-Means.
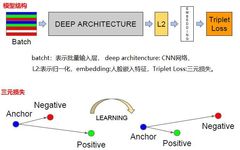
Compared to other face recognition networks, which achieve face recognition by adding classification layers, the face feature data output before the classification layer can have thousands of dimensions, and cannot well express a new face. FaceNet uses a triplet loss function based on LMNN to train and output a 128-dimensional continuous vector. The triplet loss includes two matching face fingerprints and one non-matching face fingerprint, and the objective of the loss function training is to ensure that the distance margin between matching and non-matching face fingerprints is sufficiently large. The face fingerprints come from the facial region image, which has not been aligned and only undergoes simple geometric transformations. The entire network architecture and triplet representation are as follows:
The selection of positive and negative samples requires selecting hard samples to obtain triplets, which is beneficial for better training effects and model convergence.
Code Implementation: We borrowed a TensorFlow version of FaceNet implementation from GitHub, downloaded the pre-trained FaceNet model, and based on the embedding data obtained, this will output 512-dimensional data for comparison to achieve face similarity calculation. The similarity calculation uses cosine similarity measurement, where a distance of 0 between two embedding data indicates complete consistency, a distance of 1 indicates complete difference. A value of 0.5 or 90 degrees indicates independence.
Download the pre-trained FaceNet model:
https://github.com/davidsandberg/facenet
The code for loading the model and sample data is as follows:
with tf.Graph().as_default():
with tf.Session() as sess:
# Load the model
facenet.load_model("D:/python/facenet/data/20180408-102900")
# Get input and output tensors
images_placeholder = tf.get_default_graph().get_tensor_by_name("input:0")
embeddings = tf.get_default_graph().get_tensor_by_name("embeddings:0")
phase_train_placeholder = tf.get_default_graph().get_tensor_by_name("phase_train:0")
# Run forward pass to calculate embeddings
images, names = load_face_labels()
num_labels = len(names)
feed_dict = {images_placeholder: images, phase_train_placeholder: False}
labels_embeddings = sess.run(embeddings, feed_dict=feed_dict)
The code for face comparison is as follows:
def face_compare(face_image):
# Run forward pass to calculate embeddings
feed_dict = {images_placeholder: face_image, phase_train_placeholder: False}
embedding_result = sess.run(embeddings, feed_dict=feed_dict)
minDist = 1000000
label_index = -1
for i in range(num_labels):
# Cosine similarity
dist = facenet.distance([labels_embeddings[i]], [embedding_result[0]], 1)
if minDist > dist:
label_index = i
minDist = dist
print("minDist: %1.4f"%minDist)
if minDist > 0.25:
return "unknown"
if names[label_index] == 3:
return "zhigang"
if names[label_index] == 2:
return "peter"
if names[label_index] == 1:
return "balvin"
OpenCV real-time camera call and output:
capture = cv.VideoCapture(0)
height = capture.get(cv.CAP_PROP_FRAME_HEIGHT)
width = capture.get(cv.CAP_PROP_FRAME_WIDTH)
out = cv.VideoWriter("D:/faces.mp4", cv.VideoWriter_fourcc('D', 'I', 'V', 'X'), 15,
(np.int(width), np.int(height)), True)
while True:
ret, frame = capture.read()
if ret is True:
frame = cv.flip(frame, 1)
cv.imshow("frame", frame)
rgb = cv.cvtColor(frame, cv.COLOR_BGR2RGB)
result, bb = mtcnn_align_demo(rgb)
if result is not None:
name = face_compare(result)
cv.rectangle(frame, (bb[0], bb[1]), (bb[2], bb[3]), (0, 0, 255), 1, 8, 0)
cv.putText(frame, name, (bb[0], bb[1]), cv.FONT_HERSHEY_SIMPLEX, 1.0, (0, 255, 0), 2, 8)
cv.imshow("face recognition demo", frame)
out.write(frame)
cv.imwrite("D:/face_recognition.png", frame)
c = cv.waitKey(10)
if c == 27:
break
else:
break
out.release()
capture.release()
cv.destroyAllWindows()
Face data collection is done through MTCNN for real-time face detection, collecting face data for each person to be compared, and labeling the data. The data collection code is as follows:
while True:
ret, frame = capture.read()
if ret is True:
frame = cv.flip(frame, 1)
cv.imshow("frame", frame)
rgb = cv.cvtColor(frame, cv.COLOR_BGR2RGB)
result = detection(rgb)
out.write(result)
c = cv.waitKey(10)
if c == 27:
break
else:
break
cv.destroyAllWindows()
For more details about MTCNN, see recommended reading.
Running Effect: Balvin and I
Discussion Group
Welcome to join the public account reader group to communicate with peers. Currently, there are WeChat groups for SLAM, three-dimensional vision, sensors, autonomous driving, computational photography, detection, segmentation, recognition, medical imaging, GAN, algorithm competitions and more (which will gradually be subdivided), please scan the WeChat ID below to join the group, note: “nickname + school/company + research direction”, for example: “Zhang San + Shanghai Jiao Tong University + Vision SLAM”. Please follow the format for notes, otherwise, you will not be allowed to join. After successful addition, invitations will be sent to relevant WeChat groups based on research direction. Please do not send advertisements in the group, otherwise, you will be removed from the group. Thank you for your understanding~