

1OpenVidu
OpenVidu[1] is an open-source WebRTC video conferencing platform based on the Apache 2.0[2] license. The main repository can be found at: https://github.com/OpenVidu/openvidu.
OpenVidu provides a simple, efficient, and easy-to-use API that encapsulates and abstracts the underlying operations of WebRTC. It requires only the integration of OpenVidu’s server and client to handle media streams, compatible with various platforms and front-end and back-end frameworks, and comes with rich documentation, tutorials, and sample applications.

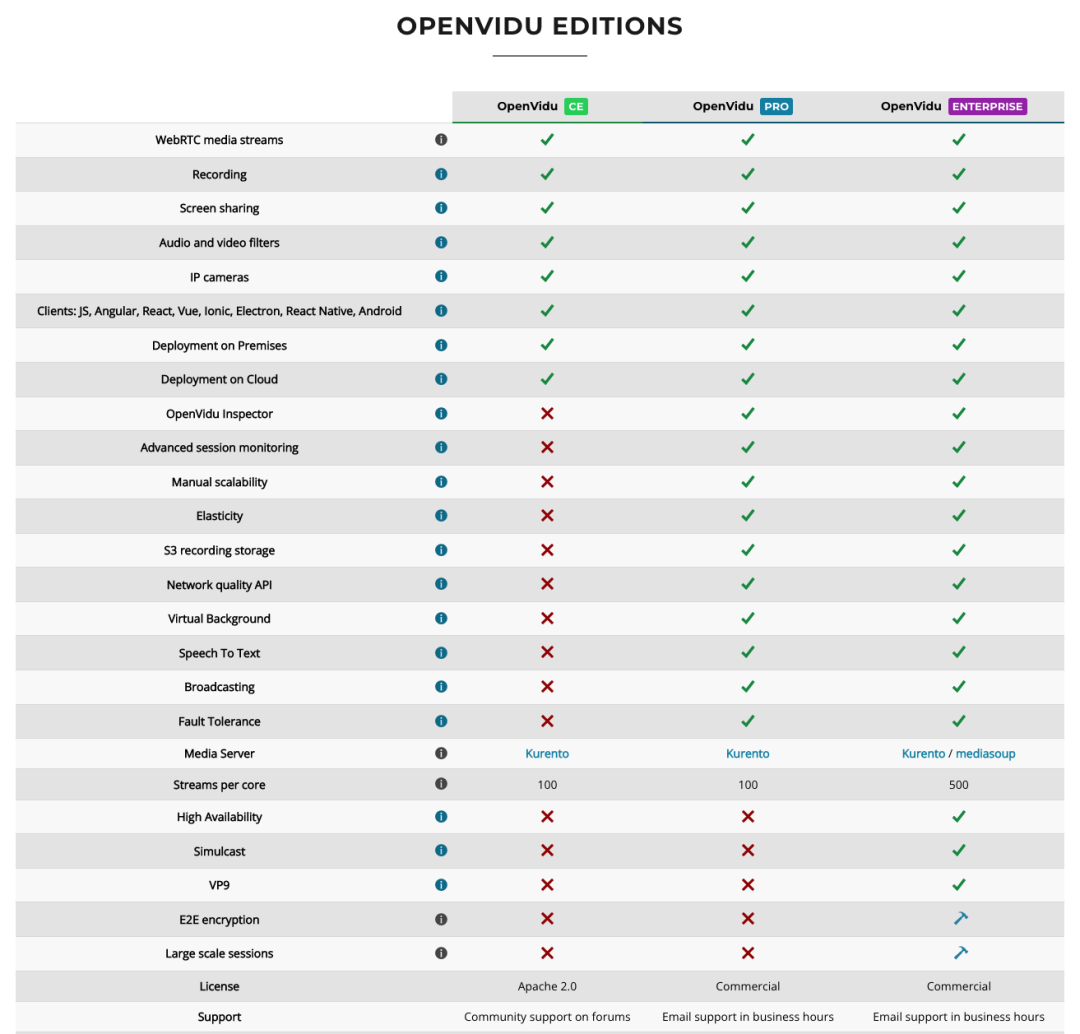
OpenVidu has three versions: CE, Pro, and Enterprise. The CE version is open-source and free to use, allowing access to most of OpenVidu’s essential features:
2Architecture[3]
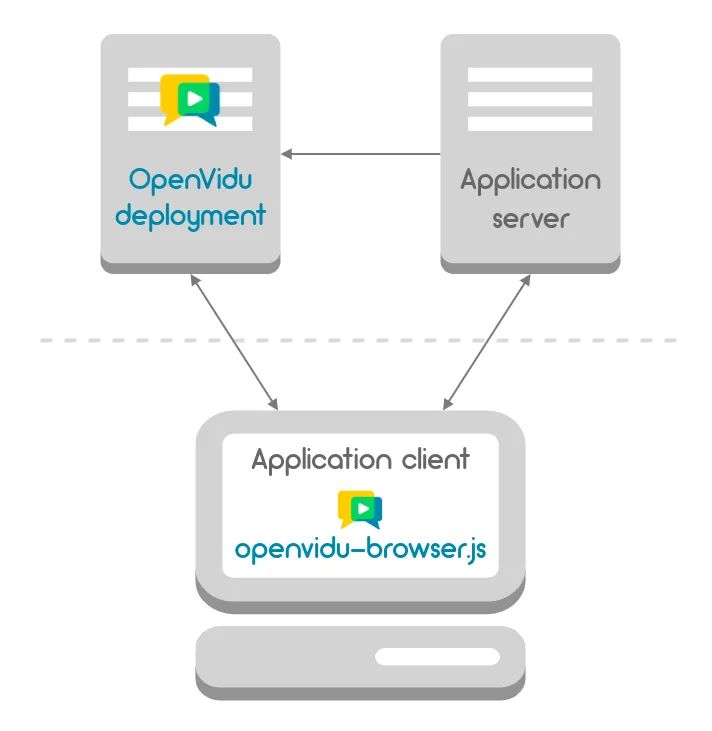
Any OpenVidu application consists of three parts:
-
OpenVidu deployment (OpenVidu deployment): can be any version of OpenVidu CE, Pro, or Enterprise; -
Application server: calls the REST API provided by the OpenVidu deployment to serve the application client; -
Application client: can be a browser, mobile, or desktop application that uses openvidu-browser.jsSDK to communicate with the OpenVidu deployment.
OpenVidu supports deployment on cloud platforms and private hardware. Deploying OpenVidu CE on premises[4] has complete documentation for deploying OpenVidu in a production environment on private hardware.
A complete OpenVidu deployment includes the following services[5]:
-
OpenVidu Server (openvidu-server): the brain of the OpenVidu platform, responsible for signaling; -
Kurento Media Server (kms): the heart of the OpenVidu platform, responsible for media; -
Coturn (coturn): a server that allows media communication in certain special networks; -
Redis (redis): manages the database of users in the Coturn service; -
Nginx (nginx): a reverse proxy that configures SSL certificates to allow both OpenVidu Server and applications to serve via standard https port (443); -
Videoconference Application (app): OpenVidu Call[6] application or other applications, optional.
This article aims to set up a minimal viable OpenVidu experience environment in a local intranet that supports multi-party video conferencing, thus reducing the Coturn and Redis services in the complete deployment above and using a single container image openvidu/openvidu-dev:2.26.0[7] that includes OpenVidu Server and Kurento Media Server, and using the OpenVidu Call application to experience multi-party video calls via https://IP.
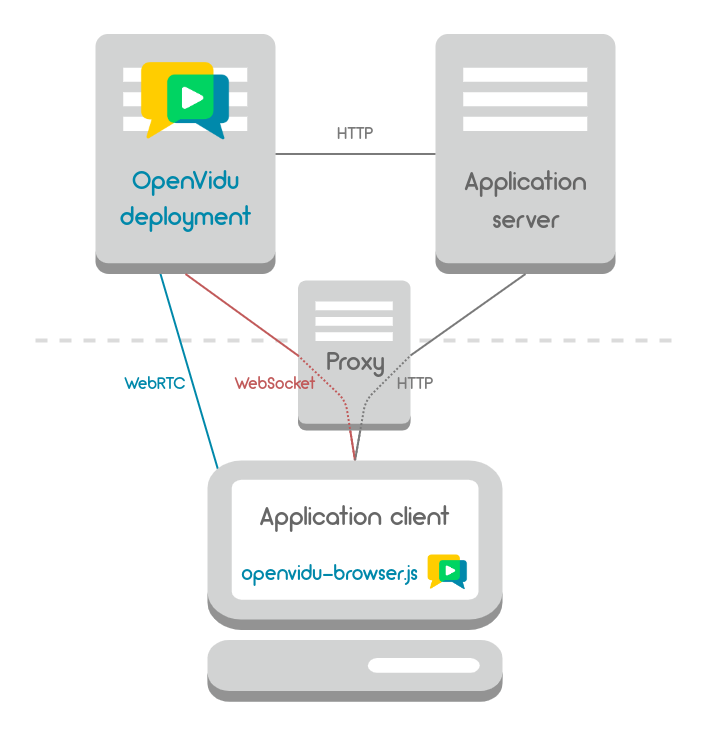
In a local development environment using only localhost or 127.0.0.1, HTTP can be used directly, but in scenarios where access via IP or domain name is required, WebRTC needs a secure connection to function, hence a reverse proxy component needs to be added to the deployment structure, as shown in the figure below[8]:
3Deployment
Next, proceed to deploy the local experience environment according to the above diagram.
OpenVidu deployment
To access OpenVidu Server from an external environment, you need to specify the IP address[9] when starting:
-
Linux: ip -4 -oneline route get 1.0.0.0 | grep -Po 'src \K\S+' -
MacOS: ipconfig getifaddr "$(route -n get 1.0.0.0 | grep 'interface' | awk '{print $2}')"
For example, in a MacOS environment, you can use the following command to start the openvidu-dev container that includes OpenVidu Server and Kurento Media Server, completing the deployment of the OpenVidu deployment component:
# Run OpenVidu deployment container with new env variable
# WARNING: this container is not suitable for production deployments of OpenVidu
# Visit https://docs.openvidu.io/en/stable/deployment
docker run -p 4443:4443 --rm \
  -e OPENVIDU_SECRET=MY_SECRET \
  -e DOMAIN_OR_PUBLIC_IP=$(ipconfig getifaddr "$(route -n get 1.0.0.0 | grep 'interface' | awk '{print $2}')") \
  -e SERVER_PORT=4443 \
  -e HTTPS_PORT=443 \
  -e FORCE_PLAIN_HTTP=false \
  -d \
openvidu/openvidu-dev:2.26.0
Other related operations:
# View logs
docker logs -f $(docker ps -a | grep openvidu-dev | awk '{print $1}')
# Stop and remove container
docker rm -f $(docker ps -a | grep openvidu-dev | awk '{print $1}')
Application server & client
You can verify the OpenVidu service deployment results through the OpenVidu Call[10] application.
The openvidu/openvidu-call:2.26.0[11] image contains a Node.js version of the front-end and back-end application, allowing for the deployment of both the Application server and Application client components in one step.
docker run -p 5000:5000 --rm \
  -e OPENVIDU_URL=https://$(ipconfig getifaddr "$(route -n get 1.0.0.0 | grep 'interface' | awk '{print $2}')") \
  -e OPENVIDU_SECRET=MY_SECRET \
  -d \
openvidu/openvidu-call:2.26.0
At this point, you can access the OpenVidu Call application interface via http://IP:5000. WebRTC-related voice, video, and other functions require the Proxy component to be deployed and accessed via HTTPS to function correctly.
Other related operations:
# View logs
docker logs -f $(docker ps -a | grep openvidu-call | awk '{print $1}')
# Stop and remove container
docker rm -f $(docker ps -a | grep openvidu-call | awk '{print $1}')
Proxy
The role of the Proxy component is to allow access to the application via HTTPS. In the local environment, you can use the certificates provided in openvidu-tutorials/certs[12] and modify the port in openvidu-tutorials/openvidu-angular/nginx.conf line 12[13] from 4200 to 5000:
    upstream client-application {
        server host.docker.internal:5000;
    }
Place the certificate files in the certs path, and after placing the modified nginx.conf file in the same directory, you can use the following command to complete the deployment of the Proxy component:
# At the root path of the tutorial
# For example: /home/user/openvidu-tutorials/openvidu-hello-world
docker run --rm -p 443:443 \
  --add-host=host.docker.internal:host-gateway \
  -v $PWD/nginx.conf:/etc/nginx/nginx.conf:ro \
  -v $PWD/certs:/etc/nginx/certs:ro \
  -d \
nginx
If your Docker version is less than 20.x, you may encounter the error Error response from daemon: invalid IP address in add-host: "host-gateway". when executing the above command. In this case, you can set the corresponding IP for the host.docker.internal domain as described in #2664[14], such as:
# At the root path of the tutorial
# For example: /home/user/openvidu-tutorials/openvidu-hello-world
docker run --rm -p 443:443 \
  --add-host=host.docker.internal:$(ipconfig getifaddr "$(route -n get 1.0.0.0 | grep 'interface' | awk '{print $2}')") \
  -v $PWD/nginx.conf:/etc/nginx/nginx.conf:ro \
  -v $PWD/certs:/etc/nginx/certs:ro \
  -d \
nginx
Other related operations:
# View logs
docker logs -f $(docker ps -a | grep nginx | awk '{print $1}')
# Stop and remove container
docker rm -f $(docker ps -a | grep nginx | awk '{print $1}')
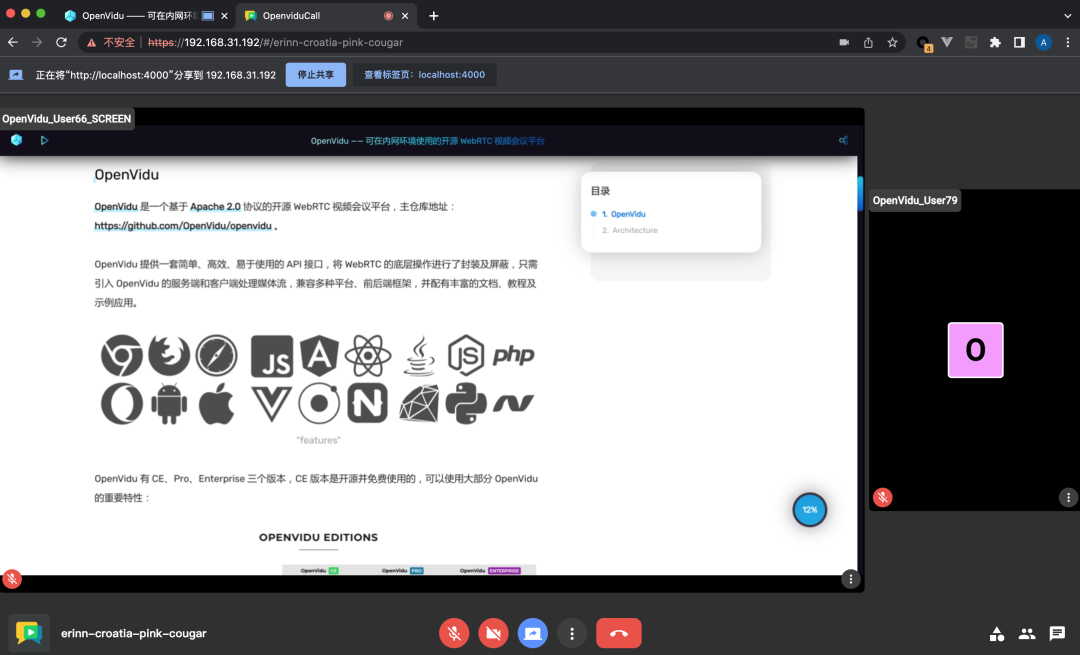
4Actual Effect
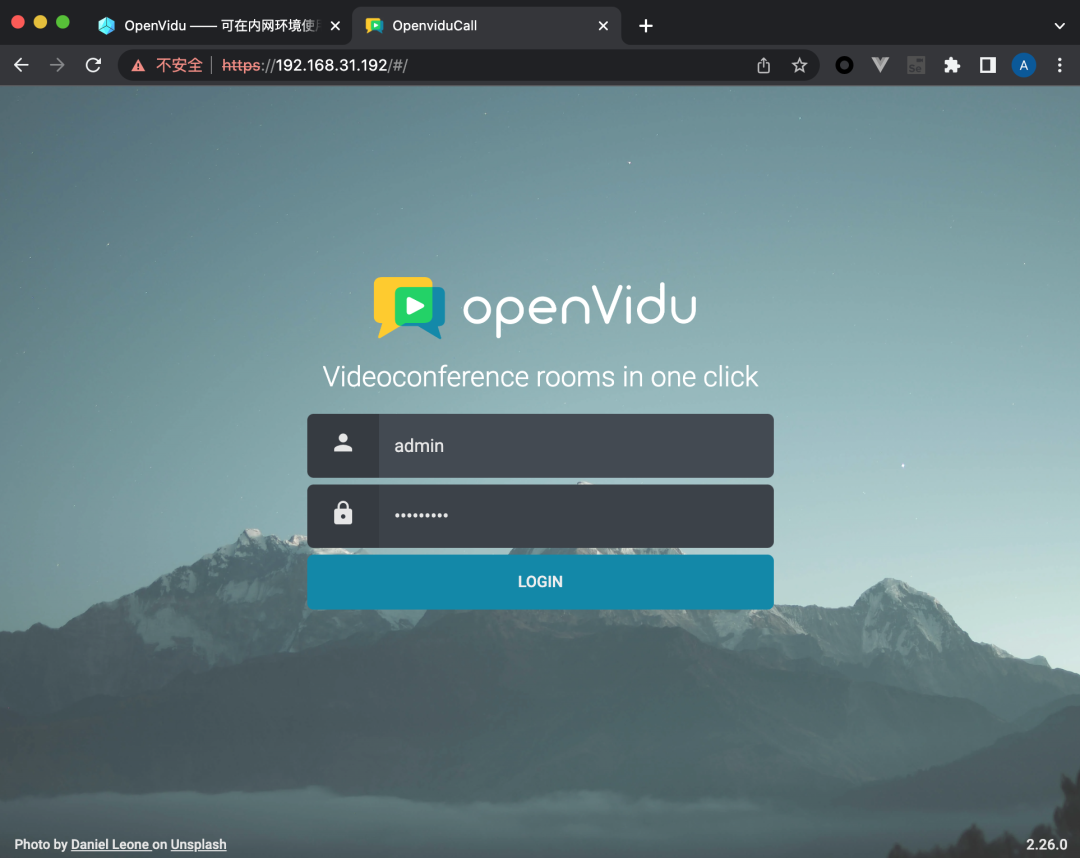
After completing the deployment of all components, you can access the OpenVidu Call application via https://IP, logging in with the username admin and the password being the value of the OPENVIDU_SECRET environment variable passed to the Docker container, which is MY_SECRET:
5Appendix
Attached is the complete nginx.conf content that can be used directly:
events {
    worker_connections 512;
}
http {
    upstream openvidu-deployment {
        server host.docker.internal:4443;
    }
    upstream server-application {
        server host.docker.internal:5000;
    }
    upstream client-application {
        server host.docker.internal:5000;
    }
    server {
        listen                  443 ssl;
        ssl_certificate         /etc/nginx/certs/cert.pem;
        ssl_certificate_key     /etc/nginx/certs/key.pem;

        proxy_set_header Host $host;
        proxy_set_header X-Real-IP $remote_addr;
        proxy_set_header X-Forwarded-For $proxy_add_x_forwarded_for;
        proxy_set_header X-Forwarded-Proto $scheme;
        proxy_set_header X-Forwarded-Proto https;
        proxy_headers_hash_bucket_size 512;
        proxy_redirect off;

        # Websockets
        proxy_http_version 1.1;
        proxy_set_header Upgrade $http_upgrade;
        proxy_set_header Connection "upgrade";

        # OpenVidu deployment API
        location /openvidu/api {
            proxy_pass http://openvidu-deployment;
        }

        # OpenVidu WebSocket
        location ~ /openvidu$ {
            proxy_pass http://openvidu-deployment;
        }

        # Server application requests
        location /api/ {
            proxy_pass http://server-application;
        }

        # Client application requests
        location / {
            proxy_pass http://client-application;
        }
    }
}
References
OpenVidu: https://openvidu.io/
[2]Apache 2.0: https://choosealicense.com/licenses/apache-2.0/
[3]Architecture: https://docs.openvidu.io/en/2.26.0/developing-your-video-app/#openvidu-application-architecture
[4]Deploying OpenVidu CE on premises: https://docs.openvidu.io/en/2.26.0/deployment/ce/on-premises/
[5]The following services: https://docs.openvidu.io/en/2.26.0/deployment/ce/on-premises/#deployment-instructions
[6]OpenVidu Call: https://openvidu.io/openvidu-call
[7]openvidu/openvidu-dev:2.26.0: https://hub.docker.com/layers/openvidu/openvidu-dev/2.26.0/images/sha256-87da7d58a44bdab566168876d7bc07296c5dfcc95a7e901ab0d3c5149caea154?context=explore
[8]The figure below: https://docs.openvidu.io/en/2.26.0/troubleshooting/#3-test-applications-in-my-network-with-multiple-devices
[9]Specify IP address: https://docs.openvidu.io/en/2.26.0/troubleshooting/#1-run-the-openvidu-deployment-with-your-local-ip-and-other-configurations
[10]OpenVidu Call: https://docs.openvidu.io/en/2.26.0/components/openvidu-call/
[11]openvidu/openvidu-call:2.26.0: https://hub.docker.com/layers/openvidu/openvidu-call/2.26.0/images/sha256-b921f99d349666d0075c10fef0e6cce76b8708336a7279ce70b92a5786ab5a79?context=explore
[12]openvidu-tutorials/certs: https://github.com/OpenVidu/openvidu-tutorials/tree/master/certs
[13]openvidu-tutorials/openvidu-angular/nginx.conf line 12: https://github.com/OpenVidu/openvidu-tutorials/blob/v2.26.0/openvidu-angular/nginx.conf#L12
[14]#2664: https://github.com/docker/cli/issues/2664#issuecomment-1294472136