
Click the above “Beginner Learning Vision” to select and add a star or “top”
Important content delivered first
Editor’s Recommendation
The project will use Python 3 to identify whether the image is pornographic, utilizing the PIL image processing library and writing an algorithm to delineate the skin areas of the image.
Editor’s Recommendation
The project will use Python 3 to identify whether the image is pornographic, utilizing the PIL image processing library and writing an algorithm to delineate the skin areas of the image.
Reprinted from丨Coder Xiao Ming
Introduction to PIL
PIL (Python Image Library) is a free image processing toolkit that provides basic image processing functions such as resizing images, rotating images, converting image formats, color space conversions (which I don’t quite understand), image enhancement (which means improving clarity and highlighting useful information in the image), histogram processing, interpolation (using known adjacent pixel values to generate unknown pixel values), and filtering, among others. Although this toolkit is not very suitable for implementing complex image processing algorithms, Python’s rapid development capabilities and object-oriented features make it very suitable for prototype development.
In PIL, any image is represented by an Image object, which is exported from a module of the same name. Therefore, to load an image, the simplest form is as follows:
import Image
img = Image.open("dip.jpg")
Note: == The first line’s Image is the module name; the second line’s img is an Image object; == The Image class is defined in the Image module. Be careful not to confuse the Image module and the Image class. Now we can perform various operations on img, and all operations on img will ultimately reflect on the dip.img image.
Environment Setup
PIL has not been updated since 2009 and does not support Python 3, so there is the Pillow project led by Alex Clark. Pillow is a friendly fork of PIL that supports Python 3, so we will install Pillow, and here is its official documentation.
Python 3.0 or above and the package management tool pip3 are already available by default. To upgrade pip3 and install the Pillow toolkit, execute the following commands:
sudo install -U pip3
sudo install Pillow
Program Principle
Identify skin areas in the image based on color (skin color) and determine whether it is a pornographic image through some conditional checks.
The key steps of the program are as follows:
-
Iterate through each pixel and check if the pixel color is skin color -
Group adjacent skin color pixels into a skin area, obtaining several skin areas -
Eliminate skin areas with very few pixels
We define the criteria for identifying non-pornographic images as follows (satisfying any one condition is true):
-
The number of skin areas is less than 3 -
The ratio of skin area pixels to all image pixels is less than 15% -
The largest skin area is less than 45% of the total skin area -
The number of skin areas exceeds 60
You can try to modify these rules until the program’s performance meets your satisfaction. Regarding the pixel skin color determination, many formulas can be found online, but there is no formula with 100% accuracy in the world. You can use the formula you find and gradually debug it after completing the program.
-
RGB Color Mode
First type: ==r > 95 and g > 40 and g < 100 and b > 20 and max([r, g, b]) – min([r, g, b]) > 15 and abs(r – g) > 15 and r > g and r > b==
Second type: ==nr = r / (r + g + b), ng = g / (r + g + b), nb = b / (r + g + b)
,nr / ng > 1.185 and r * b / (r + g + b) ** 2 > 0.107 and r * g / (r + g + b) ** 2 > 0.112== -
HSV Color Mode
==h > 0 and h < 35 and s > 0.23 and s < 0.68==
-
YCbCr Color Mode
==97.5 <= cb <= 142.5 and 134 <= cr <= 176==
An image can have zero to multiple skin areas; the program numbers them in the order they are discovered, with the first discovered area being numbered 0 and the nth discovered area being numbered n-1.
To represent pixels, we define a type called Skin, which contains some information about the pixel: a unique id, whether it is skin color, the skin area number, x-coordinate, and y-coordinate.
When iterating through all pixels, we create a corresponding Skin object for each pixel and set all the attributes of the object, where the region attribute is the number of the skin area the pixel belongs to, initialized to None. Regarding the id value for each pixel, the top-left corner is the origin, and the pixel id value is arranged according to pixel coordinates, which looks like the following image:
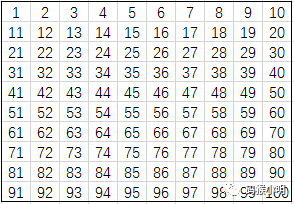
In fact, the order of the id is also the order of traversal. When iterating through all pixels, after creating the Skin object, if the current pixel is skin color and adjacent pixels are also skin color, we group these skin color pixels into one skin area.
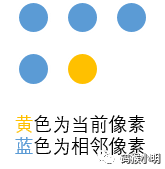
The definition of adjacent pixels: it is usually thought to be the 8 pixels surrounding the current pixel; however, in reality, only 4 need to be defined, located to the left, upper left, directly above, and upper right of the current pixel. This is because the other four pixels are behind the current pixel, and we have not yet created corresponding Skin objects for these 4 pixels:
Implementation Script
Directly create a nude.py file in Python and write the code in this file:
Import the required modules:
import sys
import os
import _io
from collections import namedtuple
from PIL import Image
We will design a Nude class:
class Nude:In this class, we first use collections.namedtuple() to define a Skin type:
Skin = namedtuple("Skin", "id skin region x y")collections.namedtuple() is a factory method that returns a subclass of the standard tuple type in Python. You need to pass a type name and the fields you need to it, and it will return a class that you can initialize and pass values for the defined fields, etc. Please refer to the official documentation for more details.
Then define the initialization method for the Nude class:
def __init__(self, path_or_image):
    # If path_or_image is an instance of Image.Image, assign directly
    if isinstance(path_or_image, Image.Image):
        self.image = path_or_image
    # If path_or_image is an instance of str, open the image
    elif isinstance(path_or_image, str):
        self.image = Image.open(path_or_image)

    # Get all color channels of the image
    bands = self.image.getbands()
    # Check if it is a single-channel image (i.e., grayscale), if so, convert it to RGB image
    if len(bands) == 1:
        # Create a new RGB image of the same size
        new_img = Image.new("RGB", self.image.size)
        # Copy the grayscale image self.image to the RGB image new_img.paste (PIL automatically performs color channel conversion)
        new_img.paste(self.image)
        f = self.image.filename
        # Replace self.image
        self.image = new_img
        self.image.filename = f

    # Store all Skin objects corresponding to the image pixels
    self.skin_map = []
    # Detected skin areas, the index of elements is the skin area number, elements are lists containing some Skin objects
    self.detected_regions = []
    # Elements are lists containing some int objects (region numbers)
    # The region numbers in these elements represent areas to be merged
    self.merge_regions = []
    # Consolidated skin areas, the index of elements is the skin area number, elements are lists containing some Skin objects
    self.skin_regions = []
    # The region numbers of the last two merged skin areas, initialized to -1
    self.last_from, self.last_to = -1, -1
    # Pornographic image judgment result
    self.result = None
    # Information obtained from processing
    self.message = None
    # Image width and height
    self.width, self.height = self.image.size
    # Total pixels in the image
    self.total_pixels = self.width * self.height
isinstance(object, classinfo)returns True if the parameterobjectis an instance of the parameterclassinfo, otherwise returns False; the parameterclassinfocan be a tuple containing severaltypeobjects, if the parameterobjectis an instance of any of those types, it returns True, otherwise returns False.
Regarding efficiency, the larger the image, the more resources and time it consumes, so sometimes it may be necessary to resize the image. Therefore, we need a method to resize the image:
def resize(self, maxwidth=1000, maxheight=1000):
    """
    Resize the image size proportionally based on the maximum width and height,
    Note: This may affect the detection algorithm's results

    If there is no change, return 0
    Original width greater than maxwidth returns 1
    Original height greater than maxheight returns 2
    Original width and height greater than maxwidth, maxheight returns 3

    maxwidth - Maximum width of the image
    maxheight - Maximum height of the image
    Parameters can be set to False to ignore
    """
    # Store return value
    ret = 0
    if maxwidth:
        if self.width > maxwidth:
            wpercent = (maxwidth / self.width)
            hsize = int((self.height * wpercent))
            fname = self.image.filename
            # Image.LANCZOS is a resampling filter used for anti-aliasing
            self.image = self.image.resize((maxwidth, hsize), Image.LANCZOS)
            self.image.filename = fname
            self.width, self.height = self.image.size
            self.total_pixels = self.width * self.height
            ret += 1
    if maxheight:
        if self.height > maxheight:
            hpercent = (maxheight / float(self.height))
            wsize = int((float(self.width) * float(hpercent)))
            fname = self.image.filename
            self.image = self.image.resize((wsize, maxheight), Image.LANCZOS)
            self.image.filename = fname
            self.width, self.height = self.image.size
            self.total_pixels = self.width * self.height
            ret += 2
    return ret
Image.resize(size, resample=0)size – A tuple containing the pixel width and height (width, height) resample – Optional resampling filter
Returns an
Imageobject
Then comes one of the most critical parsing methods:
def parse(self):
    # If there is already a result, return this object
    if self.result is not None:
        return self
    # Get all pixel data from the image
    pixels = self.image.load()
Next, iterate through each pixel, creating a corresponding Skin object for each pixel, where self._classify_skin() is the method that detects whether the pixel color is skin color:
    for y in range(self.height):
        for x in range(self.width):
            # Get the RGB values of the pixel
            # [x, y] is a shorthand for [(x,y)]
            r = pixels[x, y][0]   # red
            g = pixels[x, y][1]   # green
            b = pixels[x, y][2]   # blue
            # Check if the current pixel is a skin color pixel
            isSkin = True if self._classify_skin(r, g, b) else False
            # Assign a unique id value (1, 2, 3...height*width) to each pixel
            # Note that x, y values start from zero
            _id = x + y * self.width + 1
            # Create a corresponding Skin object for each pixel and add it to self.skin_map
            self.skin_map.append(self.Skin(_id, isSkin, None, x, y))
If the current pixel is not a skin color, skip this iteration and continue iterating:
            # If the current pixel is not a skin color pixel, skip this iteration
            if not isSkin:
                continue
If the current pixel is a skin color pixel, then it needs to be processed, first by iterating through its adjacent pixels.
Be careful with the index values of adjacent pixels, because the pixel’s id value starts from 1, while the index starts from 0. The variable _id holds the current pixel’s id value, so its index in self.skin_map is _id - 1, and so on, making its left adjacent pixel’s index in self.skin_map equal to _id - 1 - 1, the upper left pixel equal to _id - 1 - self.width - 1, the upper pixel equal to _id - 1 - self.width, and the upper right pixel equal to _id - 1 - self.width + 1:
            # Setting the upper left corner as the origin, the adjacent pixels are represented by * symbols, the current pixel by ^ symbol, the mutual positional relationship is as follows:
            # ***
            # *^
Here is a list of indices for adjacent pixels, sorted from largest to smallest; changing the order will affect the result:
            # List to store the indices of adjacent pixels, stored in order from largest to smallest, the order matters
            # Note that _id starts from 1, the corresponding index is _id-1
            check_indexes = [_id - 2, # The pixel to the left of the current pixel
                             _id - self.width - 2,  # The pixel to the upper left of the current pixel
                             _id - self.width - 1,  # The pixel directly above the current pixel
                             _id - self.width]  # The pixel to the upper right of the current pixel
To record the region number of skin color pixels among adjacent pixels, initialize it to -1:
            # To record the region number of skin color pixels among adjacent pixels, initialize to -1
            region = -1
            # Iterate through each adjacent pixel's index
            for index in check_indexes:
                # Try to index the adjacent pixel's Skin object; break the loop if it doesn't exist
                try:
                    self.skin_map[index]
                except IndexError:
                    break
                # If the adjacent pixel is a skin color pixel:
                if self.skin_map[index].skin:
                    # If both the adjacent pixel and the current pixel have valid region values and are different, and the same merge task has not been added
                    if (self.skin_map[index].region != None and
                            region != None and region != -1 and
                            self.skin_map[index].region != region and
                            self.last_from != region and
                            self.last_to != self.skin_map[index].region):
                        # Then add the merge task for these two regions
                        self._add_merge(region, self.skin_map[index].region)
                    # Record the region number of this adjacent pixel
                    region = self.skin_map[index].region
The method self._add_merge() receives two region numbers, which will be added to the elements in self.merge_regions; each element in self.merge_regions is a list, and these lists contain 1 to multiple region numbers, indicating regions that are connected and need to be merged.
In the image being detected, some pixels in the first few rows do not have 4 adjacent pixels, so we need to use try for error handling.
Then, if the adjacent pixel is a skin color pixel, and both pixels’ skin region numbers are valid and different, because the pixels in the two regions are adjacent, these two regions are connected, indicating that they need to be merged. Record the region number of this adjacent skin color pixel, and then the current pixel can be assigned to this skin region.
After iterating through all adjacent pixels, handle it in two cases:
-
All adjacent pixels are not skin color pixels: a new skin area is discovered. -
There are adjacent skin color pixels with valid region numbers: the value stored in region is useful, and assign the current pixel to the region of the adjacent pixel.
            # After iterating through all adjacent pixels, if region is still -1, it indicates that all adjacent pixels are not skin color
            if region == -1:
                # Change the attribute to the new region number, note that tuples are immutable, cannot directly change attributes
                _skin = self.skin_map[_id - 1]._replace(region=len(self.detected_regions))
                self.skin_map[_id - 1] = _skin
                # Create this skin color pixel's region as a new region
                self.detected_regions.append([self.skin_map[_id - 1]])
            # If region is not equal to -1 and not None, it indicates that there are adjacent skin color pixels with valid region numbers
            elif region != None:
                # Change the region number of this pixel to be the same as the adjacent pixel
                _skin = self.skin_map[_id - 1]._replace(region=region)
                self.skin_map[_id - 1] = _skin
                # Add this pixel to the pixel list of this region
                self.detected_regions[region].append(self.skin_map[_id - 1])
somenamedtuple._replace(kwargs)returns anamedtupleinstance with specified fields replaced with the parameters’ values.
After traversing all pixels, the skin area division of the image is initially completed, but there are still some connected skin region numbers in the variable self.merge_regions that need to be merged. After merging, we can proceed to determine whether it is a pornographic image:
    # Complete all region merging tasks and store the merged regions in self.skin_regions
    self._merge(self.detected_regions, self.merge_regions)
    # Analyze skin regions to obtain judgment results
    self._analyse_regions()
    return self
The method self._merge() is used to merge the region numbers represented by the elements in self.merge_regions. The method self._analyse_regions() uses the non-pornographic image judgment rules defined earlier in the program principle section to obtain the judgment result. Now we write the methods of the Nude class that we haven’t written yet.
First, the self._classify_skin() method, which detects whether the pixel color is skin color; the skin color judgment formulas were listed earlier in the program principle section, and now it is time to use them:
# Skin color detection technology based on pixels
def _classify_skin(self, r, g, b):
    # Judgment based on RGB values
    rgb_classifier = r > 95 and \
        g > 40 and g < 100 and \
        b > 20 and \
        max([r, g, b]) - min([r, g, b]) > 15 and \
        abs(r - g) > 15 and \
        r > g and \
        r > b
    # Judgment based on processed RGB values
    nr, ng, nb = self._to_normalized(r, g, b)
    norm_rgb_classifier = nr / ng > 1.185 and \
        float(r * b) / ((r + g + b) ** 2) > 0.107 and \
        float(r * g) / ((r + g + b) ** 2) > 0.112

    # Judgment in HSV color mode
    h, s, v = self._to_hsv(r, g, b)
    hsv_classifier = h > 0 and \
        h < 35 and \
        s > 0.23 and \
        s < 0.68

    # Judgment in YCbCr color mode
    y, cb, cr = self._to_ycbcr(r, g,  b)
    ycbcr_classifier = 97.5 <= cb <= 142.5 and 134 <= cr <= 176

    # The effect is not very good, the formula still needs improvement
    # return rgb_classifier or norm_rgb_classifier or hsv_classifier or ycbcr_classifier
    return ycbcr_classifier
The conversion of color modes is not the focus of this experiment; the conversion formulas can be found online, and we can use them directly here:
def _to_normalized(self, r, g, b):
    if r == 0:
        r = 0.0001
    if g == 0:
        g = 0.0001
    if b == 0:
        b = 0.0001
    _sum = float(r + g + b)
    return [r / _sum, g / _sum, b / _sum]

def _to_ycbcr(self, r, g, b):
    # Formula source:
    # http://stackoverflow.com/questions/19459831/rgb-to-ycbcr-conversion-problems
    y = .299*r + .587*g + .114*b
    cb = 128 - 0.168736*r - 0.331364*g + 0.5*b
    cr = 128 + 0.5*r - 0.418688*g - 0.081312*b
    return y, cb, cr

def _to_hsv(self, r, g, b):
    h = 0
    _sum = float(r + g + b)
    _max = float(max([r, g, b]))
    _min = float(min([r, g, b]))
    diff = float(_max - _min)
    if _sum == 0:
        _sum = 0.0001

    if _max == r:
        if diff == 0:
            h = sys.maxsize
        else:
            h = (g - b) / diff
    elif _max == g:
        h = 2 + ((g - r) / diff)
    else:
        h = 4 + ((r - g) / diff)

    h *= 60
    if h < 0:
        h += 360

    return [h, 1.0 - (3.0 * (_min / _sum)), (1.0 / 3.0) * _max]
The self._add_merge() method mainly operates on self.merge_regions, and the elements of self.merge_regions are lists containing some int objects (region numbers), where the region numbers represent areas to be merged. The self._add_merge() method receives two region numbers and adds them to self.merge_regions.
How these two region numbers are added needs to be divided into 3 cases:
-
Both passed region numbers exist in self.merge_regions -
One of the passed region numbers exists in self.merge_regions -
Both passed region numbers do not exist in self.merge_regions
For specific handling methods, see the code:
def _add_merge(self, _from, _to):
    # Assign the two region numbers to class attributes
    self.last_from = _from
    self.last_to = _to

    # Record a certain index value of self.merge_regions, initialized to -1
    from_index = -1
    # Record a certain index value of self.merge_regions, initialized to -1
    to_index = -1


    # Iterate through each element of self.merge_regions
    for index, region in enumerate(self.merge_regions):
        # Iterate through each region number in the element
        for r_index in region:
            if r_index == _from:
                from_index = index
            if r_index == _to:
                to_index = index

    # If both region numbers exist in self.merge_regions
    if from_index != -1 and to_index != -1:
        # If these two region numbers exist in two different lists
        # Then merge these two lists
        if from_index != to_index:
            self.merge_regions[from_index].extend(self.merge_regions[to_index])
            del(self.merge_regions[to_index])
        return

    # If both region numbers do not exist in self.merge_regions
    if from_index == -1 and to_index == -1:
        # Create a new region number list
        self.merge_regions.append([_from, _to])
        return
    # If one of the two region numbers exists in self.merge_regions
    if from_index != -1 and to_index == -1:
        # Add the region number that does not exist in self.merge_regions
        # to the list of the other region number
        self.merge_regions[from_index].append(_to)
        return
    # If one of the two region numbers to be merged exists in self.merge_regions
    if from_index == -1 and to_index != -1:
        # Add the region number that does not exist in self.merge_regions
        # to the list of the other region number
        self.merge_regions[to_index].append(_from)
        return
While looping through the sequence, you can use the enumerate() function to obtain both the index position and the corresponding value simultaneously; in the above code, the index position is index, and the corresponding value is region. The self._merge() method merges the region numbers represented by the elements in self.merge_regions to obtain a new list of skin regions:
def _merge(self, detected_regions, merge_regions):
    # Create a new list new_detected_regions
    # Its elements will be lists containing some Skin objects representing pixels
    # The elements of new_detected_regions represent skin areas, with element indices being region numbers
    new_detected_regions = []

    # Merge all regions represented by the elements in merge_regions
    for index, region in enumerate(merge_regions):
        try:
            new_detected_regions[index]
        except IndexError:
            new_detected_regions.append([])
        for r_index in region:
            new_detected_regions[index].extend(detected_regions[r_index])
            detected_regions[r_index] = []

    # Add the remaining skin areas to new_detected_regions
    for region in detected_regions:
        if len(region) > 0:
            new_detected_regions.append(region)

    # Clean up new_detected_regions
    self._clear_regions(new_detected_regions)

        # Add the remaining skin areas to new_detected_regions
        for region in detected_regions:
            if len(region) > 0:
                new_detected_regions.append(region)

        # Clean up new_detected_regions
        self._clear_regions(new_detected_regions)
The self._clear_regions() method only retains skin regions with pixel counts greater than a specified number in self.skin_regions:
# Skin region cleaning function
# Only save skin regions with pixel counts greater than specified
def _clear_regions(self, detected_regions):
    for region in detected_regions:
        if len(region) > 30:
            self.skin_regions.append(region)
The self._analyse_regions() method is very simple; its job is to perform a series of checks to conclude whether the image is pornographic:
# Analyze regions
def _analyse_regions(self):
    # If the number of skin regions is less than 3, it is not pornographic
    if len(self.skin_regions) < 3:
        self.message = "Less than 3 skin regions ({_skin_regions_size})".format(
            _skin_regions_size=len(self.skin_regions))
        self.result = False
        return self.result

    # Sort the skin regions
    self.skin_regions = sorted(self.skin_regions, key=lambda s: len(s),
                               reverse=True)

    # Calculate the total number of skin pixels
    total_skin = float(sum([len(skin_region) for skin_region in self.skin_regions]))

    # If the ratio of skin regions to the entire image is less than 15%, then it is not a pornographic image
    if total_skin / self.total_pixels * 100 < 15:
        self.message = "Total skin percentage lower than 15 ({:.2f})".format(total_skin / self.total_pixels * 100)
        self.result = False
        return self.result

    # If the largest skin area is less than 45% of the total skin area, it is not a pornographic image
    if len(self.skin_regions[0]) / total_skin * 100 < 45:
        self.message = "The biggest region contains less than 45 ({:.2f})".format(len(self.skin_regions[0]) / total_skin * 100)
        self.result = False
        return self.result

    # If the number of skin areas exceeds 60, it is not a pornographic image
    if len(self.skin_regions) > 60:
        self.message = "More than 60 skin regions ({})".format(len(self.skin_regions))
        self.result = False
        return self.result

    # Other cases are considered pornographic images
    self.message = "Nude!!"
    self.result = True
    return self.result
Then we can organize the information obtained from the analysis:
def inspect(self):
    _image = '{} {} {}×{}'.format(self.image.filename, self.image.format, self.width, self.height)
    return "{_image}: result={_result} message='{_message}'".format(_image=_image, _result=self.result, _message=self.message)
If the Nude class is completed like this, running the script will only yield True or False results. We need a more intuitive feeling of the program’s analysis effects, so we can generate a copy of the original image, but this copy will only be black and white, where white represents the skin area; this way, we can intuitively perceive the program’s analysis effects.
In the previous code, we had operations to obtain the pixel RGB values, and setting the pixel RGB values is simply the inverse operation, which is quite simple. However, be careful not to operate on the original image when setting pixel RGB values:
# Generate an image file in the source file directory to visualize skin areas
    def showSkinRegions(self):
    # Return if no result has been obtained
    if self.result is None:
        return
    # Set of IDs of skin pixels
    skinIdSet = set()
    # Make a copy of the original image
    simage = self.image
    # Load data
    simageData = simage.load()

    # Store the IDs of skin pixels in skinIdSet
    for sr in self.skin_regions:
        for pixel in sr:
            skinIdSet.add(pixel.id)
    # Set skin pixels in the image to white, others to black
    for pixel in self.skin_map:
        if pixel.id not in skinIdSet:
            simageData[pixel.x, pixel.y] = 0, 0, 0
        else:
            simageData[pixel.x, pixel.y] = 255, 255, 255
    # Absolute path of the source file
    filePath = os.path.abspath(self.image.filename)
    # Directory of the source file
    fileDirectory = os.path.dirname(filePath) + '/'
    # Full file name of the source file
    fileFullName = os.path.basename(filePath)
    # Separate the full file name of the source file to obtain the file name and extension
    fileName, fileExtName = os.path.splitext(fileFullName)
    # Save the image
    simage.save('{}{}_{}{}'.format(fileDirectory, fileName,'Nude' if self.result else 'Normal', fileExtName))
The variable skinIdSet uses a set instead of a list for performance considerations; the set in Python is implemented as a hash table, providing high query efficiency. Finally, we support command-line parameters for completion! We use the argparse module to implement command-line support. The argparse module makes it very easy to write user-friendly command-line interfaces. The program only needs to define the required parameters, and argparse will handle how to parse these parameters from sys.argv. The argparse module will also automatically generate help and usage information and produce error messages when the user provides illegal parameters.
For specific usage, please refer to the official documentation of argparse:
if __name__ == "__main__":
    import argparse

    parser = argparse.ArgumentParser(description='Detect nudity in images.')
    parser.add_argument('files', metavar='image', nargs='+',
                        help='Images you wish to test')
    parser.add_argument('-r', '--resize', action='store_true',
                        help='Reduce image size to increase speed of scanning')
    parser.add_argument('-v', '--visualization', action='store_true',
                        help='Generating areas of skin image')

    args = parser.parse_args()

    for fname in args.files:
        if os.path.isfile(fname):
            n = Nude(fname)
            if args.resize:
                n.resize(maxheight=800, maxwidth=600)
            n.parse()
            if args.visualization:
                n.showSkinRegions()
            print(n.result, n.inspect())
        else:
            print(fname, "is not a file")
Testing Effects
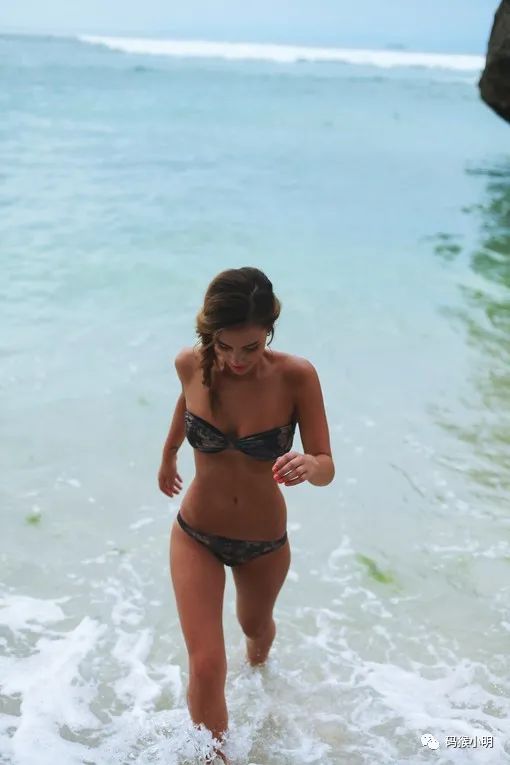
Let’s start with a very serious test image:
Run the following command in the terminal of PyCharm to execute the script, note to use python3 instead of python:
python3 nude.py -v 1.jpgRun screenshot:

This indicates that 1.jpg is not a pornographic image.
Conclusion
This project familiarized me with the use of PIL and understanding the principles of pornographic image checking. The main implementation difficulty lies in the detection and integration of skin areas. There are many areas for improvement in the project, such as the skin color detection formula, conditions for determining pornography, and performance issues. I need to learn about improving performance using multithreading or multiprocessing.
Good news!
The Beginner Learning Vision Knowledge Planet
is now open to the public👇👇👇


Download 1: OpenCV-Contrib Extension Module Chinese Version Tutorial
Reply "Extension Module Chinese Tutorial" in the background of "Beginner Learning Vision" public account to download the first Chinese version of the OpenCV extension module tutorial on the internet, covering more than twenty chapters including extension module installation, SFM algorithms, stereo vision, target tracking, biological vision, super-resolution processing, etc.

Download 2: 52 Lectures on Practical Python Vision Projects
Reply "Python Vision Practical Projects" in the background of "Beginner Learning Vision" public account to download 31 practical vision projects including image segmentation, mask detection, lane detection, vehicle counting, eyeliner application, license plate recognition, character recognition, emotion detection, text content extraction, facial recognition, etc., to assist in quickly learning computer vision.

Download 3: 20 Lectures on OpenCV Practical Projects
Reply "OpenCV Practical Projects 20 Lectures" in the background of "Beginner Learning Vision" public account to download 20 practical projects based on OpenCV, achieving advanced learning of OpenCV.

Group Chat

Welcome to join the public account reader group to communicate with peers. Currently, there are WeChat groups for SLAM, 3D vision, sensors, autonomous driving, computational photography, detection, segmentation, recognition, medical imaging, GAN, algorithm competitions, etc. (will gradually be subdivided later). Please scan the WeChat number below to join the group, with the note: "nickname + school/company + research direction", for example: "Zhang San + Shanghai Jiao Tong University + Vision SLAM". Please follow the format for notes; otherwise, it will not be approved. Once added successfully, you will be invited to enter the related WeChat group based on your research direction. Please do not send advertisements in the group; otherwise, you will be removed from the group. Thank you for your understanding~