Machine Heart Release
Author: Feng Qinyuan
Not long ago, the AV video face-swapping star DeepFake became popular. This article will guide you step by step on how to achieve face swapping.
If you are hearing about DeepFake for the first time, be sure to click the video above to personally experience how Nicolas’s face occupies every film in the world.
Project Practice
How can we achieve face swapping in videos?
Since a video is a sequence of images, we just need to switch the faces in each image to get a new video with swapped faces. So how do we switch the images in a video? We need to first locate the faces in the video and then switch them. We will find that the problem of face swapping can be broken down into the following steps.
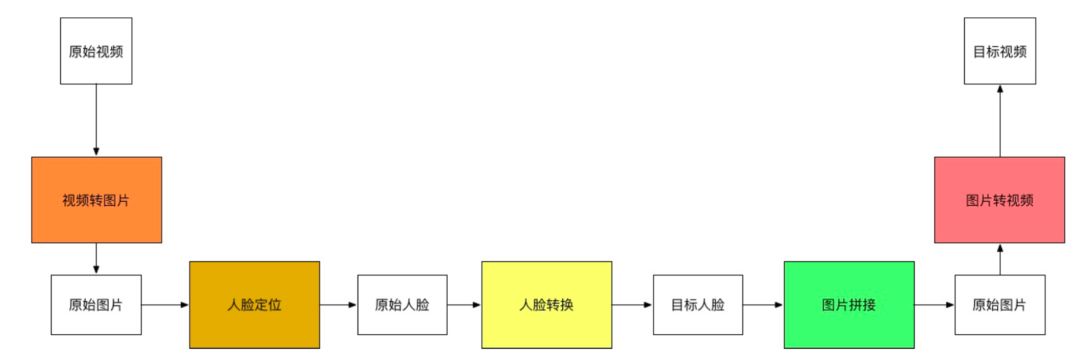
Thus, we will introduce these five steps in the following sections.
Video to Image
FFmpeg
FFmpeg provides a library of tools for processing audio, video, subtitles, and related source data. The core libraries include:
-
libavcodec provides encoding capabilities
-
libavformat implements stream protocols, container types, and basic I/O access
-
libavutil includes diverse functions like hashing and decompression
-
libavfilter provides the ability to modify audio and video in a chained manner
-
libavdevice provides an abstraction for device access
-
libswresample implements mixing capabilities
-
libswscale implements color and scale transformation capabilities
It mainly provides three tools:
-
ffmpeg is used to process multimedia content
-
ffplay is a minimalist player
-
ffprobe is a tool for analyzing multimedia content
Thus, we can implement the video to image functionality with the following command:
ffmpeg -i clipname -vf fps=framerate -qscale:v 2 "imagename%04d.jpg"
Specifically, the above command can generate images from a video at a fixed frequency.
Face Localization
Basic Algorithm
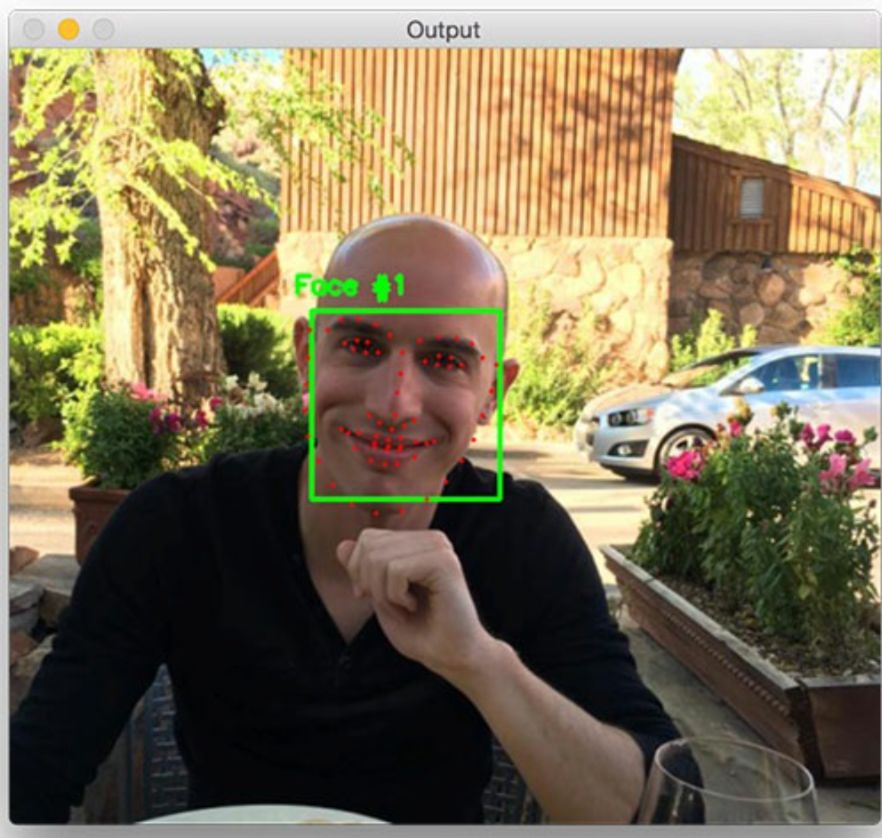
Face localization is a relatively mature field, mainly utilizing the functions of the dlib library. While we can customize a face recognition algorithm, we can also use existing general-purpose face recognition libraries.
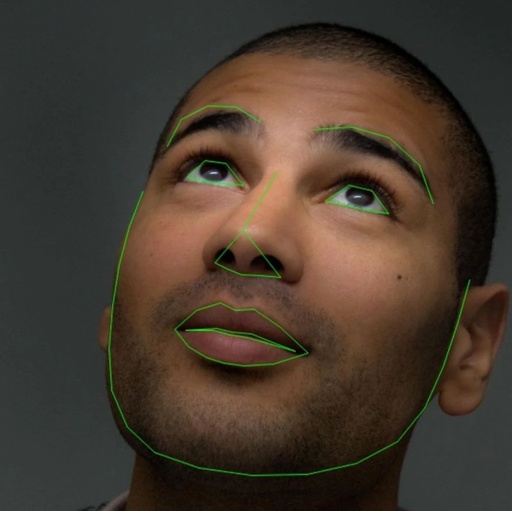
There are two types of algorithms, one is the HOG face landmark detection algorithm.
(Source: Facial landmarks with dlib, OpenCV, and Python)
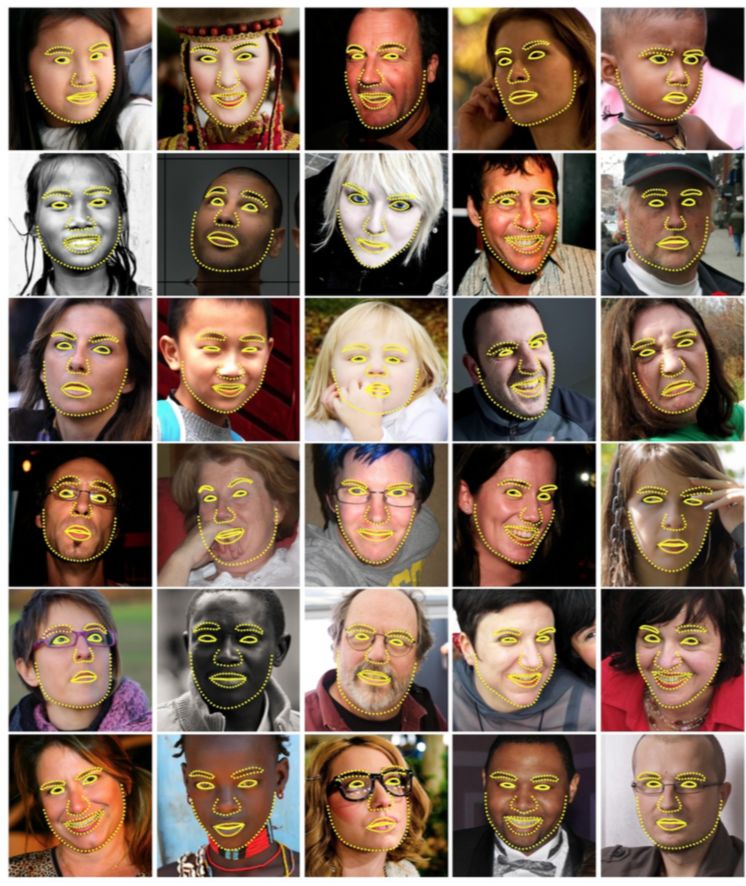
The effect of this algorithm is shown in the image above. It divides the face into the following areas:
-
Eyes (left/right)
-
Brows (left/right)
-
Nose
-
Mouth
-
Chin
Based on these landmarks, we can not only proceed with the subsequent face swapping but also detect the specific shape of the face, blinking state, etc. For example, we can connect these points to obtain more features.
(Source: Real-Time Face Pose Estimation)
Finding face landmarks is a prediction problem, where the input is an image and a region of interest, and the output is the key points of the region of interest.
How does HOG find faces? This is a general detection algorithm:
-
Find positive samples from the dataset and calculate HOG descriptors
-
Find negative samples from the dataset and calculate HOG descriptors
-
Use classification algorithms based on HOG descriptors
-
Classify on negative samples at different starting points and scales, and find misclassified HOGs
-
Based on the negative samples from the previous step, retrain the model
Here’s a question: how to calculate HOG descriptors? We can calculate the brightness of each point and represent each point as a vector pointing towards the darker direction. As shown in the image below:
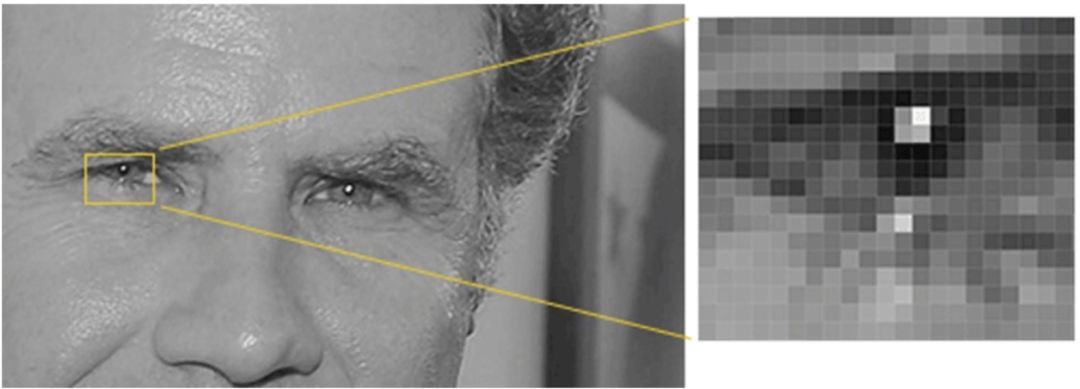
(Source: Machine Learning is Fun! Part 4: Modern Face Recognition with Deep Learning)
(Source: Machine Learning is Fun! Part 4: Modern Face Recognition with Deep Learning)
Why do we do this? Because the absolute value of each point is affected by the environment, while the relative value is more stable. Therefore, by representing gradient changes, we can prepare high-quality data. Of course, we can also further aggregate adjacent points to produce more representative data.
Now we can proceed with detection
-
First, find feasible intervals based on different starting points and scales on the new image;
-
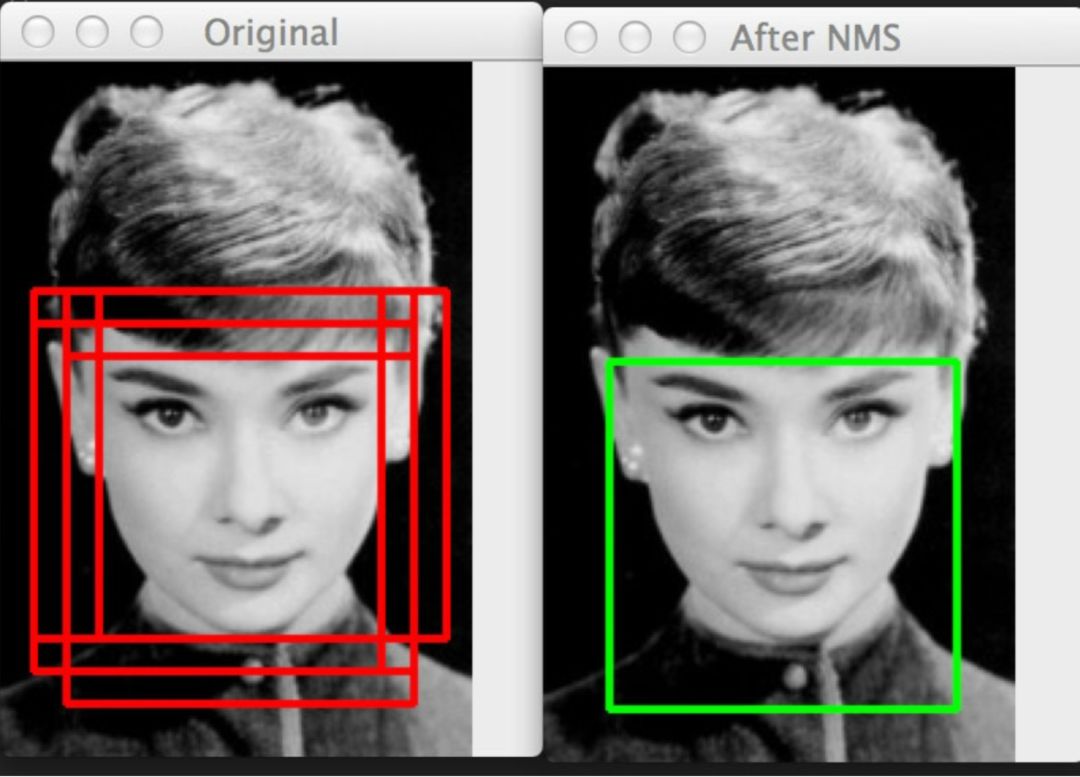
Use the non-maximum suppression method to reduce redundancy and repetition. The image below shows a case with redundancy and one without; this method essentially finds a matrix with the maximum probability to cover overlapping matrices, and this process is repeated.
(Source: Histogram of Oriented Gradients and Object Detection)
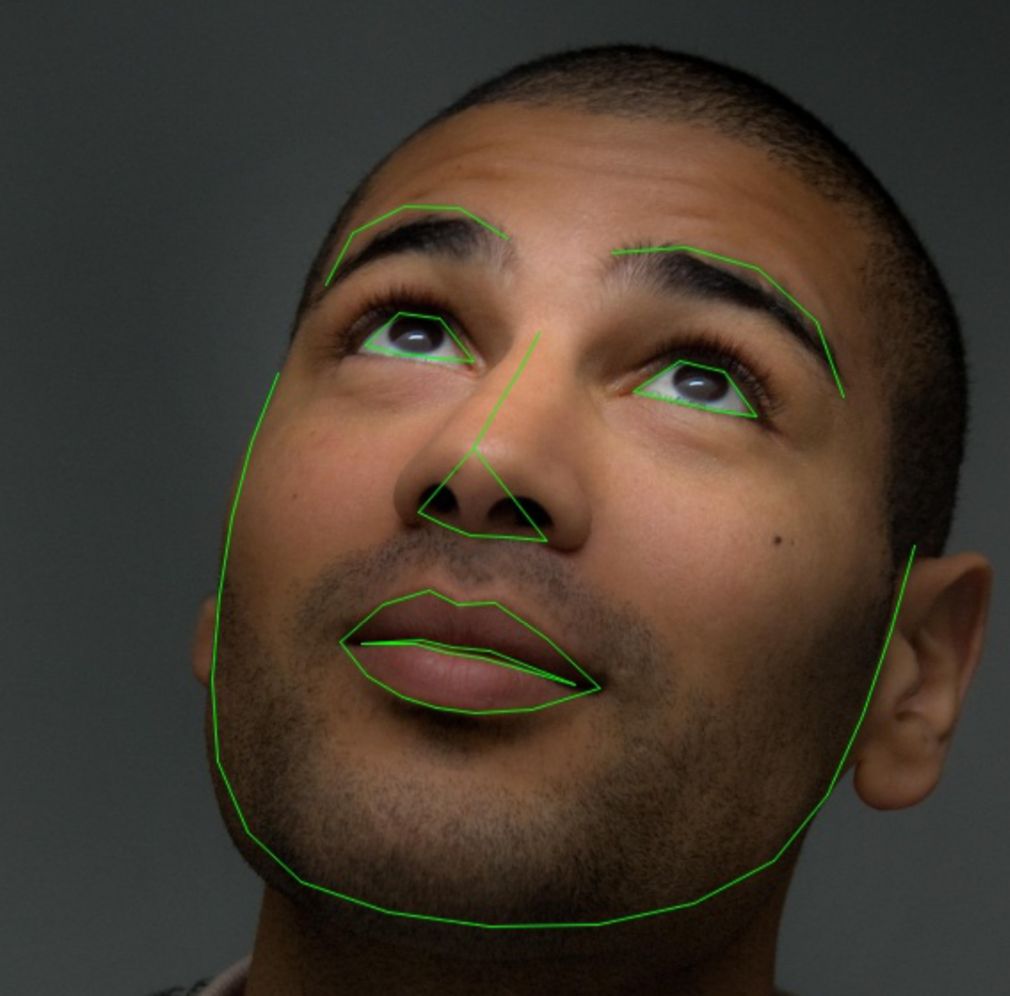
With the contours established, we can find the face landmarks. The algorithm for finding face landmarks is based on the paper “One Millisecond Face Alignment with an Ensemble of Regression Trees.” In simple terms, it uses a pre-labeled training set to train a combination of regression trees for prediction.
(Source: One Millisecond Face Alignment with an Ensemble of Regression Trees)
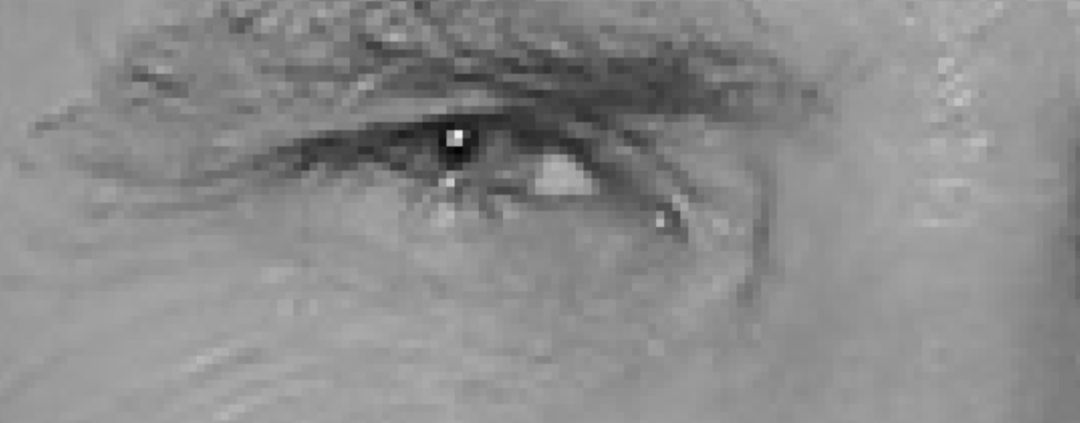
On this basis, we can mark these 68 points.

(Source: Facial landmarks with dlib, OpenCV, and Python)
Based on the coordinates of the 68 face landmarks, we can calculate the face angle to crop the adjusted face. However, dlib requires that the face recognized must be a full face, which reduces our sample set and some specific sample scenarios. Additionally, since the face is 64*64 pixels in size, we also need to address clarity issues.
Another method is to use CNN to train a model for face recognition. CNN can detect more angles but requires more resources and may fail on large files.
Data Preparation
Our goal is to convert the original face into the target face, so we need to collect images of the original face and the target face. If you choose a celebrity, you can directly use Google Images to obtain the pictures you want. Although images from the video can also be used, collecting some diverse data is also a good idea. Of course, I used pictures of my wife and myself, so I can directly export them from our Photos. After generating the face data, it’s best to check carefully to avoid unwanted faces or other things appearing in your training set.
extract.py
The algorithm used by Deepfake for locating faces is as follows:
import cv2 # Open-source computer vision library

from pathlib import Path # Provides object-oriented file access
from tqdm import tqdm # Provides progress bar display
import os # Provides operating system-related access
import numpy as np # Provides scientific computing-related functionalities

from lib.cli import DirectoryProcessor, rotate_image # Process files in a directory and save them to a new directory; rotate images, actually in utils
from lib.utils import get_folder # Get a folder, create if it does not exist
from lib.multithreading import pool_process # Multi-process concurrent computation
from lib.detect_blur import is_blurry # Determine if an image is blurry
from plugins.PluginLoader import PluginLoader # Load corresponding algorithms

class ExtractTrainingData(DirectoryProcessor): # Extract headshots from the training set
    def create_parser(self, subparser, command, description):
        self.optional_arguments = self.get_optional_arguments()
        self.parser = subparser.add_parser(
            command,
            help="Extract the faces from a pictures.",
            description=description,
            epilog="Questions and feedback: \
            https://github.com/deepfakes/faceswap-playground"
            )

 # Parameter configuration part omitted

    def process(self):
        extractor_name = "Align" # Corresponds to Extract_Align.py
        self.extractor = PluginLoader.get_extractor(extractor_name)()
        processes = self.arguments.processes
        try:
            if processes != 1: # Multi-process image processing
                files = list(self.read_directory())
                for filename, faces in tqdm(pool_process(self.processFiles, files, processes=processes), total = len(files)):
                    self.num_faces_detected += 1
                    self.faces_detected[os.path.basename(filename)] = faces
            else: # Single-process image processing
                for filename in tqdm(self.read_directory()):
                    try:
                        image = cv2.imread(filename)
                        self.faces_detected[os.path.basename(filename)] = self.handleImage(image, filename)
                    except Exception as e:
                        if self.arguments.verbose:
                            print('Failed to extract from image: {}. Reason: {}'.format(filename, e))
                        pass
        finally:
            self.write_alignments()

    def processFiles(self, filename): # Function to process a single image
        try:
            image = cv2.imread(filename)
            return filename, self.handleImage(image, filename)
        except Exception as e:
            if self.arguments.verbose:
                print('Failed to extract from image: {}. Reason: {}'.format(filename, e))
            pass
        return filename, []

    def getRotatedImageFaces(self, image, angle): # Get faces from the image after rotating it by a fixed angle
        rotated_image = rotate_image(image, angle)
        faces = self.get_faces(rotated_image, rotation=angle)
        rotated_faces = [(idx, face) for idx, face in faces]
        return rotated_faces, rotated_image

    def imageRotator(self, image): # Get a series of rotated faces
        ''' rotates the image through rotation_angles to try to find a face '''
        for angle in self.rotation_angles:
            rotated_faces, rotated_image = self.getRotatedImageFaces(image, angle)
            if len(rotated_faces) > 0:
                if self.arguments.verbose:
                    print('found face(s) by rotating image {} degrees'.format(angle))
                break
        return rotated_faces, rotated_image

    def handleImage(self, image, filename):
        faces = self.get_faces(image)
        process_faces = [(idx, face) for idx, face in faces]

        # No face found, try rotating the image
        if self.rotation_angles is not None and len(process_faces) == 0:
            process_faces, image = self.imageRotator(image)

        rvals = []
        for idx, face in process_faces:
            # Draw face landmarks
            if self.arguments.debug_landmarks:
                for (x, y) in face.landmarksAsXY():
                    cv2.circle(image, (x, y), 2, (0, 0, 255), -1)

            resized_image, t_mat = self.extractor.extract(image, face, 256, self.arguments.align_eyes)
            output_file = get_folder(self.output_dir) / Path(filename).stem

            # Check if the image is blurry
            if self.arguments.blur_thresh is not None:
                aligned_landmarks = self.extractor.transform_points(face.landmarksAsXY(), t_mat, 256, 48)
                feature_mask = self.extractor.get_feature_mask(aligned_landmarks / 256, 256, 48)
                feature_mask = cv2.blur(feature_mask, (10, 10))
                isolated_face = cv2.multiply(feature_mask, resized_image.astype(float)).astype(np.uint8)
                blurry, focus_measure = is_blurry(isolated_face, self.arguments.blur_thresh)
                # print("{} focus measure: {}".format(Path(filename).stem, focus_measure))
                # cv2.imshow("Isolated Face", isolated_face)
                # cv2.waitKey(0)
                # cv2.destroyAllWindows()
                if blurry:
                    print("{}'s focus measure of {} was below the blur threshold, moving to \"blurry\"".format(Path(filename).stem, focus_measure))
                    output_file = get_folder(Path(self.output_dir) / Path("blurry")) / Path(filename).stem

            cv2.imwrite('{}_{}{}'.format(str(output_file), str(idx), Path(filename).suffix), resized_image) # Generate new image
            f = {
                "r": face.r,
                "x": face.x,
                "w": face.w,
                "y": face.y,
                "h": face.h,
                "landmarksXY": face.landmarksAsXY()
            }
            rvals.append(f)
        return rvals
Note that the feature landmark-based algorithm does not perform well on tilted faces, and CNN can also be introduced.
Face Transformation
What is the basic principle of face transformation? Suppose you stare at a person’s video for 100 hours, then you are shown a photo of another person and asked to draw the photo from memory; you would likely draw something very similar to the first person.
The model we use is an Autoencoder. Interestingly, this model generates the original image again based on the original image. The encoder of the Autoencoder compresses the image, while the decoder restores it, as shown in the image below:
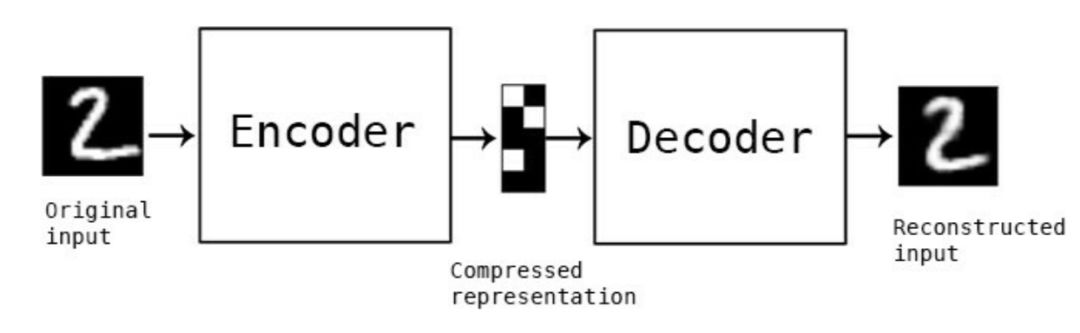
(Source: Building Autoencoders in Keras)
On this basis, even if we input another person’s face, it will be encoded by the Autoencoder into something similar to the original face.
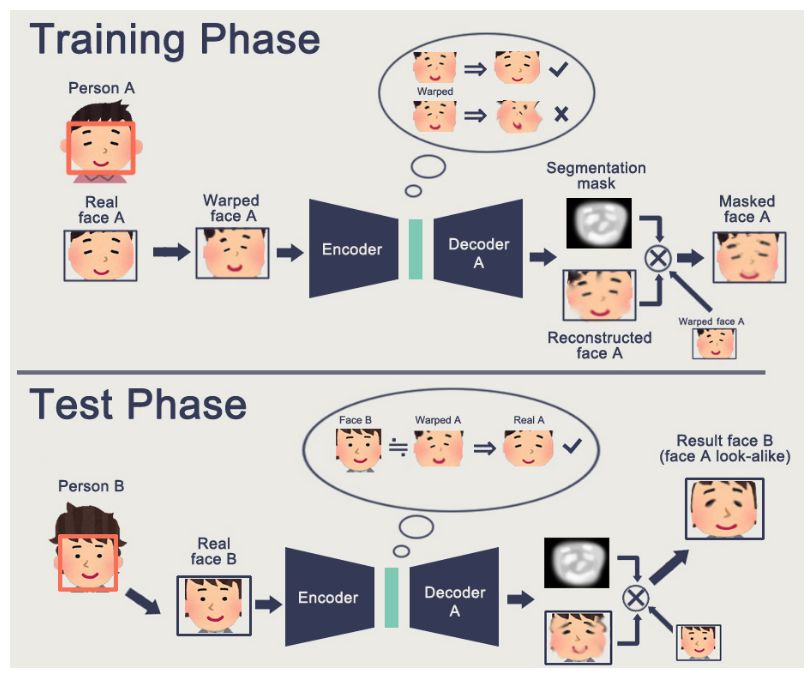
To enhance our final effect, we also need to learn the common attributes related to faces and the specific attributes related to individual faces. Therefore, we use a unified encoder for all faces, which aims to learn the common aspects of faces; then, we have a separate decoder for each face, which is designed to learn the individual characteristics of faces. This way, when you use face B through the encoder and then use decoder A, you will get a face that has the expression of B but the face of A.
This process is represented mathematically as follows:
X' = Decoder(Encoder(Shuffle(X))
Loss = L1Loss(X'-X)

A' = Decoder_A(Encoder(Shuffle(A)))
Loss_A = L1Loss(A'-A)

B' = Decoder_B(Encoder(Shuffle(B)))
Loss_B = L1Loss(B'-B)
Specifically, during the training process, we input image A and restore face A through the encoder and decoder; then we input image B and restore face B through the same encoder but a different decoder. This iterative process continues until the loss decreases to a threshold. During model training, I recommend reducing the loss to 0.02 for better results.
This uses a relatively standard modeling approach. It is worth noting that the author introduces the PixelShuffler() function to distort the image slightly, which increases the difficulty of learning but ultimately enables the model to achieve the desired effect. Think about the rationale behind this; if you only do simple problems, you will not develop the ability to solve difficult problems. However, if I introduce some variations into the problems, it is enough to help you grow.
Since the modeling uses the distortion of the original image A to restore A, and in application, it uses B to restore A, the choice of distortion method will greatly influence the final result. Therefore, how to select a better distortion method is also an important question.
When we merge images, there is a challenge of how to ensure quality while preventing image jitter. Thus, we need to introduce relevant algorithms to handle these situations. Therefore, we can see that a seemingly straightforward face transformation algorithm needs to consider various special situations in practical operation; this is what truly makes it grounded.
train.py
The following is the algorithm logic for training:
import cv2 # Open-source computer vision library
import numpy # Provides scientific computing-related functionalities
import time # Provides time-related functionalities

import threading # Provides multi-threading functionalities
from lib.utils import get_image_paths, get_folder # Get images from a directory; obtain a folder, create if it does not exist
from lib.cli import FullPaths, argparse, os, sys
from plugins.PluginLoader import PluginLoader # Load corresponding algorithms

tf = None
set_session = None
def import_tensorflow_keras(): # Load TensorFlow and keras modules when needed
    ''' Import the TensorFlow and keras set_session modules only when they are required '''
    global tf
    global set_session
    if tf is None or set_session is None:
        import tensorflow
        import keras.backend.tensorflow_backend # keras relies on the underlying tensorflow for specific computations
        tf = tensorflow
        set_session = keras.backend.tensorflow_backend.set_session

class TrainingProcessor(object): # Trainer
    arguments = None

    def __init__(self, subparser, command, description='default'): # Initialize trainer
        self.argument_list = self.get_argument_list()
        self.optional_arguments = self.get_optional_arguments()
        self.parse_arguments(description, subparser, command)
        self.lock = threading.Lock()

    def process_arguments(self, arguments):
        self.arguments = arguments
        print("Model A Directory: {}".format(self.arguments.input_A))
        print("Model B Directory: {}".format(self.arguments.input_B))
        print("Training data directory: {}".format(self.arguments.model_dir))

        self.process()

 # Parameter configuration part omitted

    @staticmethod
    def get_optional_arguments(): # Create an array to store parameters
        ''' Put the arguments in a list so that they are accessible from both argparse and gui '''
        # Override this for custom arguments
        argument_list = []
        return argument_list

    def parse_arguments(self, description, subparser, command):
        parser = subparser.add_parser(
            command,
            help="This command trains the model for the two faces A and B.",
            description=description,
            epilog="Questions and feedback: \
            https://github.com/deepfakes/faceswap-playground")

        for option in self.argument_list:
            args = option['opts']
            kwargs = {key: option[key] for key in option.keys() if key != 'opts'}
            parser.add_argument(*args, **kwargs)

        parser = self.add_optional_arguments(parser)
        parser.set_defaults(func=self.process_arguments)

    def add_optional_arguments(self, parser):
        for option in self.optional_arguments:
            args = option['opts']
            kwargs = {key: option[key] for key in option.keys() if key != 'opts'}
            parser.add_argument(*args, **kwargs)
        return parser

    def process(self): # Specific execution
        self.stop = False
        self.save_now = False

        thr = threading.Thread(target=self.processThread, args=(), kwargs={}) # Thread execution
        thr.start()

        if self.arguments.preview:
            print('Using live preview')
            while True:
                try:
                    with self.lock:
                        for name, image in self.preview_buffer.items():
                            cv2.imshow(name, image)

                    key = cv2.waitKey(1000)
                    if key == ord('\n') or key == ord('\r'):
                        break
                    if key == ord('s'):
                        self.save_now = True
                except KeyboardInterrupt:
                    break
        else:
            try:
                input() # TODO how to catch a specific key instead of Enter?
                # there isnt a good multiplatform solution: https://stackoverflow.com/questions/3523174/raw-input-in-python-without-pressing-enter
            except KeyboardInterrupt:
                pass

        print("Exit requested! The trainer will complete its current cycle, save the models and quit (it can take up a couple of seconds depending on your training speed). If you want to kill it now, press Ctrl + c")
        self.stop = True
        thr.join() # waits until thread finishes

    def processThread(self):
        try:
            if self.arguments.allow_growth:
                self.set_tf_allow_growth()

            print('Loading data, this may take a while...') # Load data
            # this is so that you can enter case insensitive values for trainer
            trainer = self.arguments.trainer
            trainer = "LowMem" if trainer.lower() == "lowmem" else trainer
            model = PluginLoader.get_model(trainer)(get_folder(self.arguments.model_dir), self.arguments.gpus) # Read model
            model.load(swapped=False)

            images_A = get_image_paths(self.arguments.input_A) # Images A
            images_B = get_image_paths(self.arguments.input_B) # Images B
            trainer = PluginLoader.get_trainer(trainer) # Create trainer
            trainer = trainer(model, images_A, images_B, self.arguments.batch_size, self.arguments.perceptual_loss) # Set trainer parameters

            print('Starting. Press "Enter" to stop training and save model')

            for epoch in range(0, self.arguments.epochs):

                save_iteration = epoch % self.arguments.save_interval == 0

                trainer.train_one_step(epoch, self.show if (save_iteration or self.save_now) else None) # Perform one step of training

                if save_iteration:
                    model.save_weights()

                if self.stop:
                    break

                if self.save_now:
                    model.save_weights()
                    self.save_now = False

            model.save_weights()
            exit(0)
        except KeyboardInterrupt:
            try:
                model.save_weights()
            except KeyboardInterrupt:
                print('Saving model weights has been cancelled!')
            exit(0)
        except Exception as e:
            raise e
            exit(1)

    def set_tf_allow_growth(self):
        import_tensorflow_keras()
        config = tf.ConfigProto()
        config.gpu_options.allow_growth = True
        config.gpu_options.visible_device_list="0"
        set_session(tf.Session(config=config))

    preview_buffer = {}

    def show(self, image, name=''): # Provide preview
        try:
            if self.arguments.redirect_gui:
                scriptpath = os.path.realpath(os.path.dirname(sys.argv[0]))
                img = '.gui_preview.png'
                imgfile = os.path.join(scriptpath, img)
                cv2.imwrite(imgfile, image)
            elif self.arguments.preview:
                with self.lock:
                    self.preview_buffer[name] = image
            elif self.arguments.write_image:
                cv2.imwrite('_sample_{}.jpg'.format(name), image)
        except Exception as e:
            print("could not preview sample")
            raise e
Trainer.py
The following implements a specific training:
import time
import numpy
from lib.training_data import TrainingDataGenerator, stack_images

class Trainer():
    random_transform_args = { # Initialize parameters
        'rotation_range': 10,
        'zoom_range': 0.05,
        'shift_range': 0.05,
        'random_flip': 0.4,
    }

    def __init__(self, model, fn_A, fn_B, batch_size, *args):
        self.batch_size = batch_size
        self.model = model

        generator = TrainingDataGenerator(self.random_transform_args, 160) # Read the required data
        self.images_A = generator.minibatchAB(fn_A, self.batch_size)
        self.images_B = generator.minibatchAB(fn_B, self.batch_size)

    def train_one_step(self, iter, viewer): # Train one step
        epoch, warped_A, target_A = next(self.images_A)
        epoch, warped_B, target_B = next(self.images_B)

        loss_A = self.model.autoencoder_A.train_on_batch(warped_A, target_A) # Calculate loss
        loss_B = self.model.autoencoder_B.train_on_batch(warped_B, target_B)
        print("[{0}] [#{1:05d}] loss_A: {2:.5f}, loss_B: {3:.5f}".format(time.strftime("%H:%M:%S"), iter, loss_A, loss_B),
            end='\r')

        if viewer is not None:
            viewer(self.show_sample(target_A[0:14], target_B[0:14]), "training")

    def show_sample(self, test_A, test_B):
        figure_A = numpy.stack([
            test_A,
            self.model.autoencoder_A.predict(test_A),
            self.model.autoencoder_B.predict(test_A),
        ], axis=1)
        figure_B = numpy.stack([
            test_B,
            self.model.autoencoder_B.predict(test_B),
            self.model.autoencoder_A.predict(test_B),
        ], axis=1)

        if test_A.shape[0] % 2 == 1:
            figure_A = numpy.concatenate ([figure_A, numpy.expand_dims(figure_A[0],0) ])
            figure_B = numpy.concatenate ([figure_B, numpy.expand_dims(figure_B[0],0) ])

        figure = numpy.concatenate([figure_A, figure_B], axis=0)
        w = 4
        h = int( figure.shape[0] / w)
        figure = figure.reshape((w, h) + figure.shape[1:])
        figure = stack_images(figure)

        return numpy.clip(figure * 255, 0, 255).astype('uint8')
AutoEncoder.py
The following is the algorithm logic for the AutoEncoder we use:
# Base class for AutoEncoder

import os, shutil

encoderH5 = 'encoder.h5'
decoder_AH5 = 'decoder_A.h5'
decoder_BH5 = 'decoder_B.h5'

class AutoEncoder:
    def __init__(self, model_dir, gpus):
        self.model_dir = model_dir
        self.gpus = gpus

        self.encoder = self.Encoder()
        self.decoder_A = self.Decoder()
        self.decoder_B = self.Decoder()

        self.initModel()

    def load(self, swapped):
        (face_A,face_B) = (decoder_AH5, decoder_BH5) if not swapped else (decoder_BH5, decoder_AH5)

        try: # Load weights
            self.encoder.load_weights(str(self.model_dir / encoderH5))
            self.decoder_A.load_weights(str(self.model_dir / face_A))
            self.decoder_B.load_weights(str(self.model_dir / face_B))
            print('loaded model weights')
            return True
        except Exception as e:
            print('Failed loading existing training data.')
            print(e)
            return False

    def save_weights(self): # Save weights
        model_dir = str(self.model_dir)
        if os.path.isdir(model_dir + "_bk"):
            shutil.rmtree(model_dir + "_bk")
        shutil.move(model_dir,  model_dir + "_bk")
        os.mkdir(model_dir)
        self.encoder.save_weights(str(self.model_dir / encoderH5))
        self.decoder_A.save_weights(str(self.model_dir / decoder_AH5))
        self.decoder_B.save_weights(str(self.model_dir / decoder_BH5))
        print('saved model weights')
Model.py
The following is our specific model:
# Based on the original https://www.reddit.com/r/deepfakes/ code sample + contribs

from keras.models import Model as KerasModel
from keras.layers import Input, Dense, Flatten, Reshape
from keras.layers.advanced_activations import LeakyReLU
from keras.layers.convolutional import Conv2D
from keras.optimizers import Adam

from .AutoEncoder import AutoEncoder
from lib.PixelShuffler import PixelShuffler

from keras.utils import multi_gpu_model

IMAGE_SHAPE = (64, 64, 3)
ENCODER_DIM = 1024

class Model(AutoEncoder):
    def initModel(self):
        optimizer = Adam(lr=5e-5, beta_1=0.5, beta_2=0.999)  # Deeply understand Adam optimization
        x = Input(shape=IMAGE_SHAPE)

        self.autoencoder_A = KerasModel(x, self.decoder_A(self.encoder(x)))
        self.autoencoder_B = KerasModel(x, self.decoder_B(self.encoder(x)))

        if self.gpus > 1:
            self.autoencoder_A = multi_gpu_model( self.autoencoder_A , self.gpus)
            self.autoencoder_B = multi_gpu_model( self.autoencoder_B , self.gpus)

        self.autoencoder_A.compile(optimizer=optimizer, loss='mean_absolute_error')
        self.autoencoder_B.compile(optimizer=optimizer, loss='mean_absolute_error')

    def converter(self, swap):
        autoencoder = self.autoencoder_B if not swap else self.autoencoder_A
        return lambda img: autoencoder.predict(img)

    def conv(self, filters):
        def block(x):
            x = Conv2D(filters, kernel_size=5, strides=2, padding='same')(x)
            x = LeakyReLU(0.1)(x)
            return x
        return block

    def upscale(self, filters):
        def block(x):
            x = Conv2D(filters * 4, kernel_size=3, padding='same')(x)
            x = LeakyReLU(0.1)(x) # Use LeakyReLU activation function
            x = PixelShuffler()(x) # Change the size of the filter to 1/4 of the original, doubling height and width
            return x
        return block

    def Encoder(self):
        input_ = Input(shape=IMAGE_SHAPE)
        x = input_
        x = self.conv(128)(x)
        x = self.conv(256)(x)
        x = self.conv(512)(x)
        x = self.conv(1024)(x)
        x = Dense(ENCODER_DIM)(Flatten()(x))
        x = Dense(4 * 4 * 1024)(x)
        x = Reshape((4, 4, 1024))(x)
        x = self.upscale(512)(x)
        return KerasModel(input_, x)

    def Decoder(self):
        input_ = Input(shape=(8, 8, 512))
        x = input_
        x = self.upscale(256)(x)
        x = self.upscale(128)(x)
        x = self.upscale(64)(x)
        x = Conv2D(3, kernel_size=5, padding='same', activation='sigmoid')(x)
        return KerasModel(input_, x)
The entire network structure is as follows:
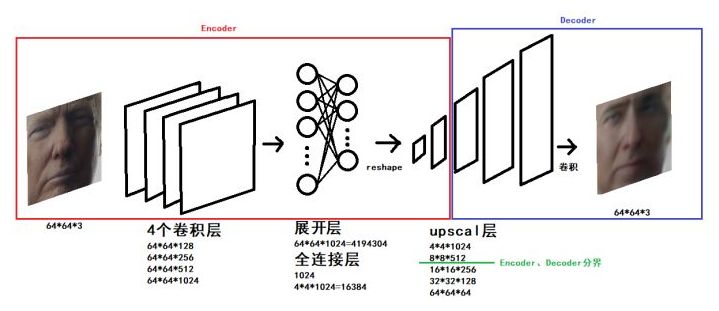
Source: How the viral video face-swapping is made?
We can see that after going through four convolutional layers, flattening layer, and fully connected layer, we start to upscale the entire model. When we upscale halfway, we cut the encoder and decoder to ensure the separation of commonality and individuality.
convert.py
Based on training, we can now perform image conversion.
import cv2
import re
import os

from pathlib import Path
from tqdm import tqdm

from lib.cli import DirectoryProcessor, FullPaths
from lib.utils import BackgroundGenerator, get_folder, get_image_paths, rotate_image

from plugins.PluginLoader import PluginLoader

class ConvertImage(DirectoryProcessor):
    filename = ''
    def create_parser(self, subparser, command, description):
        self.optional_arguments = self.get_optional_arguments()
        self.parser = subparser.add_parser(
            command,
            help="Convert a source image to a new one with the face swapped.",
            description=description,
            epilog="Questions and feedback: \
            https://github.com/deepfakes/faceswap-playground"
        )

 # Parameter configuration part omitted

    def process(self): # Perform model conversion and stitching
        # Original & LowMem models go with Adjust or Masked converter
        # Note: GAN prediction outputs a mask + an image, while other predicts only an image
        model_name = self.arguments.trainer
        conv_name = self.arguments.converter
        self.input_aligned_dir = None

        model = PluginLoader.get_model(model_name)(get_folder(self.arguments.model_dir), self.arguments.gpus)
        if not model.load(self.arguments.swap_model):
            print('Model Not Found! A valid model must be provided to continue!')
            exit(1)

        input_aligned_dir = Path(self.arguments.input_dir)/Path('aligned')
        if self.arguments.input_aligned_dir is not None:
            input_aligned_dir = self.arguments.input_aligned_dir
        try:
            self.input_aligned_dir = [Path(path) for path in get_image_paths(input_aligned_dir)]
            if len(self.input_aligned_dir) == 0:
                print('Aligned directory is empty, no faces will be converted!')
            elif len(self.input_aligned_dir) <= len(self.input_dir)/3:
                print('Aligned directory contains an amount of images much less than the input, are you sure this is the right directory?')
        except:
            print('Aligned directory not found. All faces listed in the alignments file will be converted.')

        converter = PluginLoader.get_converter(conv_name)(model.converter(False),
            trainer=self.arguments.trainer,
            blur_size=self.arguments.blur_size,
            seamless_clone=self.arguments.seamless_clone,
            sharpen_image=self.arguments.sharpen_image,
            mask_type=self.arguments.mask_type,
            erosion_kernel_size=self.arguments.erosion_kernel_size,
            match_histogram=self.arguments.match_histogram,
            smooth_mask=self.arguments.smooth_mask,
            avg_color_adjust=self.arguments.avg_color_adjust
        )

        batch = BackgroundGenerator(self.prepare_images(), 1)

        # frame ranges stuff...
        self.frame_ranges = None

        # split out the frame ranges and parse out "min" and "max" values
        minmax = {
            "min": 0, # never any frames less than 0
            "max": float("inf")
        }

        if self.arguments.frame_ranges:
            self.frame_ranges = [tuple(map(lambda q: minmax[q] if q in minmax.keys() else int(q), v.split("-"))) for v in self.arguments.frame_ranges]

        # last number regex. I know regex is hacky, but its reliablyhacky(tm).
        self.imageidxre = re.compile(r'(\d+)(?!.*\d)')

        for item in batch.iterator():
            self.convert(converter, item)

    def check_skipframe(self, filename):
        try:
            idx = int(self.imageidxre.findall(filename)[0])
            return not any(map(lambda b: b[0]<=idx<=b[1], self.frame_ranges))
        except:
            return False

    def check_skipface(self, filename, face_idx):
        aligned_face_name = '{}_{}{}'.format(Path(filename).stem, face_idx, Path(filename).suffix)
        aligned_face_file = Path(self.arguments.input_aligned_dir) / Path(aligned_face_name)
        # TODO: Remove this temporary fix for backwards compatibility of filenames
        bk_compat_aligned_face_name = '{}{}{}'.format(Path(filename).stem, face_idx, Path(filename).suffix)
        bk_compat_aligned_face_file = Path(self.arguments.input_aligned_dir) / Path(bk_compat_aligned_face_name)
        return aligned_face_file not in self.input_aligned_dir and bk_compat_aligned_face_file not in self.input_aligned_dir

    def convert(self, converter, item):
        try:
            (filename, image, faces) = item

            skip = self.check_skipframe(filename)
            if self.arguments.discard_frames and skip:
                return

            if not skip: # process frame as normal
                for idx, face in faces:
                    if self.input_aligned_dir is not None and self.check_skipface(filename, idx):
                        print ('face {} for frame {} was deleted, skipping'.format(idx, os.path.basename(filename)))
                        continue
                    # Check for image rotations and rotate before mapping face
                    if face.r != 0:
                        height, width = image.shape[:2]
                        image = rotate_image(image, face.r)
                        image = converter.patch_image(image, face, 64 if "128" not in self.arguments.trainer else 128)
                        # TODO: This switch between 64 and 128 is a hack for now. We should have a separate cli option for size
                        image = rotate_image(image, face.r * -1, rotated_width=width, rotated_height=height)
                    else:
                        image = converter.patch_image(image, face, 64 if "128" not in self.arguments.trainer else 128)
                        # TODO: This switch between 64 and 128 is a hack for now. We should have a separate cli option for size

            output_file = get_folder(self.output_dir) / Path(filename).name
            cv2.imwrite(str(output_file), image)
        except Exception as e:
            print('Failed to convert image: {}. Reason: {}'.format(filename, e))

    def prepare_images(self):
        self.read_alignments()
        is_have_alignments = self.have_alignments()
        for filename in tqdm(self.read_directory()):
            image = cv2.imread(filename)

            if is_have_alignments:
                if self.have_face(filename):
                    faces = self.get_faces_alignments(filename, image)
                else:
                    tqdm.write ('no alignment found for {}, skipping'.format(os.path.basename(filename)))
                    continue
            else:
                faces = self.get_faces(image)
            yield filename, image, faces
Of course, we can also optimize using GAN algorithms, so let’s take a look at the models using GAN.
(Source: shaoanlu/faceswap-GAN)
As shown in the image above, we first extract face A, then deform it, and after encoding and decoding, we generate the reconstructed face and mask. Below are our learning objectives.
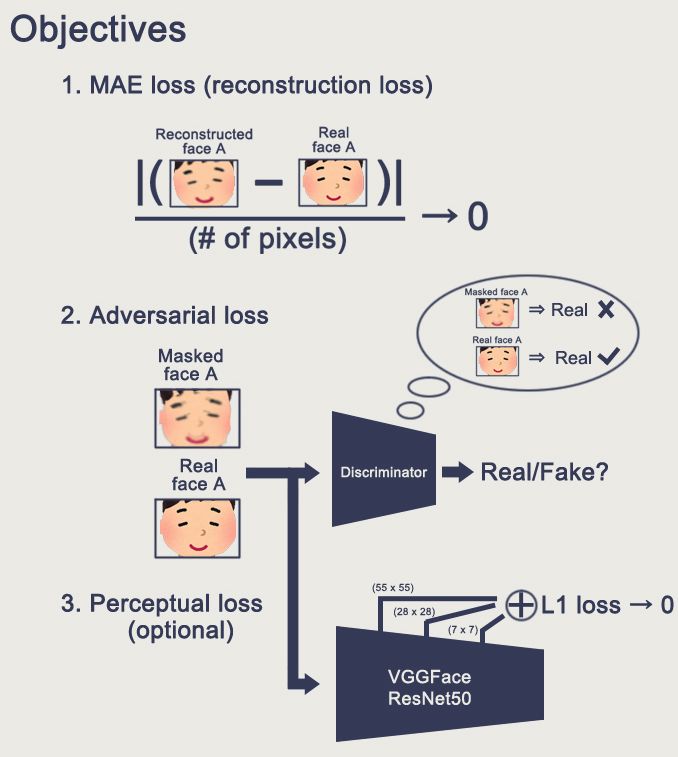
(Source: shaoanlu/faceswap-GAN)
From Images to Video
Based on our explanation of FFmpeg, you can use the following command to merge a batch of images into a video:
ffmpeg -f image2 -i imagename%04d.jpg -vcodec libx264 -crf 15 -pix_fmt yuv420p output_filename.mp4
If you want the newly generated video to have sound, you can splice the audio from the original video onto your final target video.
Cloud Platform Deployment
We can deploy a cloud platform in Google Cloud. Please refer to the video demonstration, I will show a few key steps here:

(Source: How to Create DeepFakes with Google Cloud GPU Services)

(Source: How to Create DeepFakes with Google Cloud GPU Services)

(Source: How to Create DeepFakes with Google Cloud GPU Services)

(Source: How to Create DeepFakes with Google Cloud GPU Services)
Finally, here is a screenshot of my training on Google Cloud.

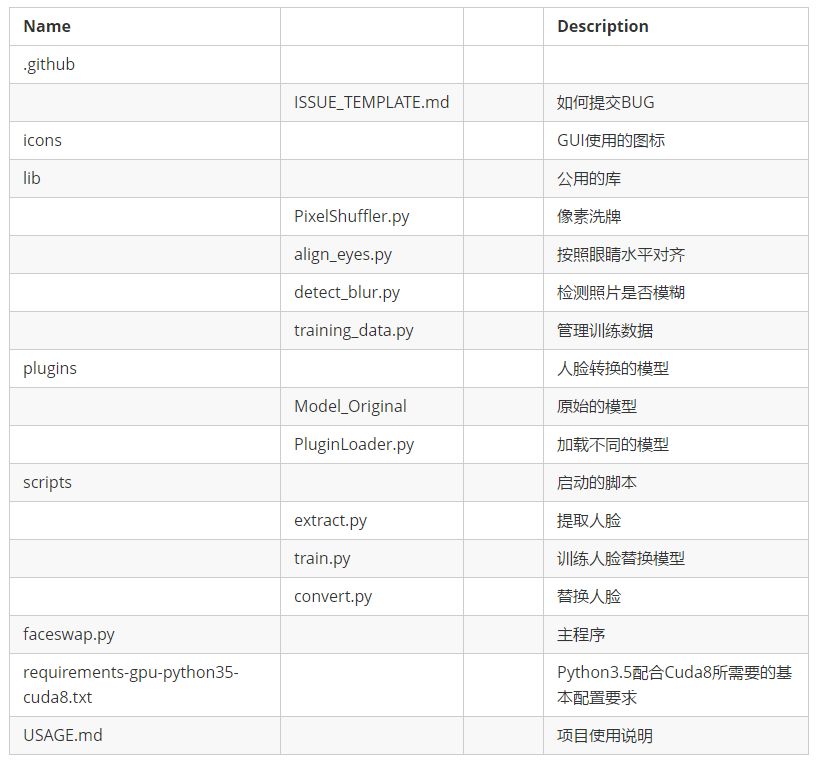
Project Architecture
Finally, let’s understand the overall architecture of the DeepFake project from a high level.
Social Impact
We have discussed the principles of Deepfake, but what are its real social values? We can use anyone to shoot a movie, then turn them into anyone we want. We can create more realistic virtual characters. Clothing shopping can be simulated more like real people.
Conclusion
We have used the following technology stack, frameworks, and platforms:
-
Dlib: C++ based machine learning algorithm library OpenCV: Computer vision algorithm library Keras: High-level API architecture on top of machine learning framework TensorFlow: Google’s open-source machine learning algorithm framework CUDA: Nvidia’s development environment for GPU acceleration
-
Google Cloud Platform: Google’s cloud computing service platform Virtualenv: Create isolated Python environments FFmpeg: Open-source multimedia audio and video processing library
-
Now get started and bring your beloved one’s face to Hollywood.
This article is published by Machine Heart, please contact this public account for authorization to reproduce..
✄————————————————
Join Machine Heart (Full-time Reporter/Intern): [email protected]
Submissions or seeking reports: [email protected]
Advertisement & Business Cooperation: [email protected]