“This is the best of times, and the worst of times. But, ultimately, it is a good era.”
The intelligent platform introduced today differs from low-code platforms like Coze and Dify, as it is entirely built using Python code.
Moreover, during application, there is no need to arrange the collaboration mode among the intelligent agents; instead, the LLM large model automatically designs their collaboration modes. It truly automates the hiring of a group of AI agents to perform various complex tasks for you!
Let me briefly explain the case being introduced today: an automated content creation team.
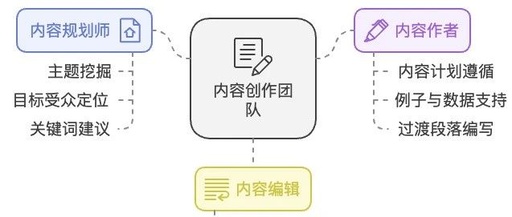
There are three roles of AI agents in the team.
The AI agents can collaborate to create high-quality articles efficiently.
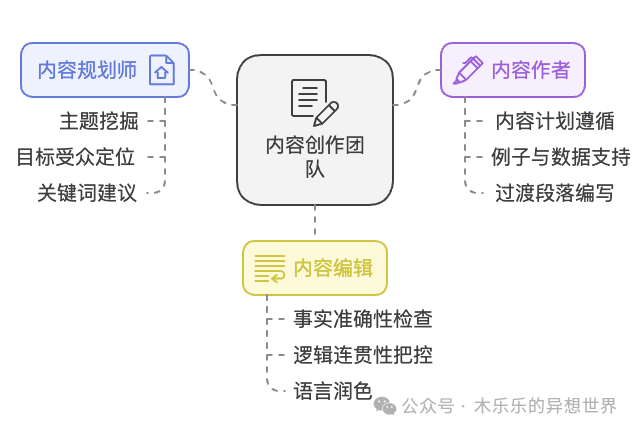
- Content Planner: Responsible for researching topic trends, identifying target audiences, creating content outlines, providing SEO keywords, and gathering data and reference sources.
- Content Writer: Writes articles based on the planner’s framework, supports arguments with examples and data, drafts transition paragraphs, and creates engaging introductions and conclusions.
- Content Editor: Checks factual accuracy, ensures logical coherence, optimizes titles and subtitles, improves article structure and fluency, refines language, and corrects spelling and grammatical errors.
Let’s take a look at the results first. The topic I input is “How to Install Crew.ai on MacBook.”
The first agent, the Content Planner, was summoned:

The output content is as follows. The article introduction, target audience, and content outline are analyzed clearly and understandably. It even thoughtfully provides SEO keywords, relevant data or sources, and corresponding resource reference links.
## Final Answer:
### Content Plan Document: How to Install Crew.ai on MacBook

#### 1. Introduction
- **Background**: Crew.ai is a powerful automation tool that helps users improve work efficiency. As more users turn to MacBook computers, understanding how to install Crew.ai on MacBook becomes particularly important.
- **Objective**: This article aims to provide MacBook users with a detailed installation guide to help them install and use Crew.ai smoothly.

#### 2. Target Audience Analysis
- **Main Audience**: MacBook users, especially those interested in automation tools, tech enthusiasts, developers, and business users.
- **Interests**: Improving work efficiency, automating tasks, using technical tools.
- **Pain Points**: Technical difficulties during the installation process, compatibility issues, lack of detailed installation guides.

#### 3. Content Outline
- **Introduction**
  - Introduce Crew.ai and its importance
  - Why MacBook users need to know how to install Crew.ai
- **Preparation**
  - Check the system requirements of MacBook
  - Ensure that necessary software (such as Python, Homebrew) is installed on MacBook
- **Installation Steps**
  - Step 1: Install Homebrew
  - Step 2: Install Python
  - Step 3: Use pip to install Crew.ai
  - Step 4: Verify installation
- **Common Issues and Solutions**
  - Problems that may occur during installation and their solutions
- **Usage Guide**
  - How to start Crew.ai
  - Introduction to basic functions
- **Conclusion**
  - Summarize the installation process
  - Encourage users to try Crew.ai and share their experiences
- **Call to Action**
  - Provide relevant resource links
  - Encourage readers to share their installation experiences in the comments section

#### 4. SEO Keywords
- Main Keywords: How to Install Crew.ai on MacBook, Crew.ai Installation Guide, MacBook Automation Tools
- Secondary Keywords: Crew.ai Usage Tutorial, MacBook Technical Tools, Automation Task Tools

#### 5. Relevant Data or Sources
- **Source 1**: Crew.ai Official Documentation
- **Source 2**: MacBook System Requirements Official Page
- **Source 3**: Homebrew Installation Guide
- **Source 4**: Python Official Installation Guide

#### 6. Resources
- **Link 1**: [Crew.ai Official Documentation](https://crew.ai/docs)
- **Link 2**: [MacBook System Requirements](https://support.apple.com/en-us/HT201686)
- **Link 3**: [Homebrew Installation Guide](https://brew.sh/)
- **Link 4**: [Python Official Installation Guide](https://www.python.org/downloads/)

With this detailed content plan document, the author can write a comprehensive and easily understandable blog post to help MacBook users successfully install and use Crew.ai.
Next, the second AI agent, the Content Writer, continues the work.

The content output by the Content Writer is the first draft.
# How To Install Crew.ai On MacBook: A Detailed Guide

## Introduction

In today’s fast-paced work environment, automation tools have become essential for improving efficiency. Crew.ai, as a powerful automation tool, can help users simplify task processes and enhance work efficiency. As more users choose MacBook as their primary work device, understanding how to install Crew.ai on MacBook becomes particularly important. This article will provide you with a detailed installation guide to help you easily install Crew.ai and start enjoying the convenience of automation.

## Target Audience Analysis

The main audience of this article is MacBook users, especially those interested in automation tools, tech enthusiasts, developers, and business users. These users typically seek to improve work efficiency through technical tools but may encounter technical difficulties or compatibility issues during installation. This article will address these pain points by providing clear steps and solutions to ensure every user can successfully complete the installation.

## Preparation

Before starting the installation of Crew.ai, you need to ensure that your MacBook meets the following system requirements and that the necessary software is installed.

### Check MacBook System Requirements

- **Operating System**: macOS 10.15 (Catalina) or higher
- **Memory**: At least 8GB RAM
- **Storage Space**: At least 10GB of available space

### Install Necessary Software

1. **Homebrew**: Homebrew is a package manager for macOS that simplifies the software installation process.
2. **Python**: Crew.ai is developed based on Python, so Python 3.7 or higher needs to be installed.

## Installation Steps

### Step 1: Install Homebrew

Homebrew is one of the most popular package managers on macOS, helping you easily install and manage software packages. Here are the steps to install Homebrew:

1. Open Terminal.
2. Enter the following command and press Enter:
   ```bash
   /bin/bash -c "$(curl -fsSL https://raw.githubusercontent.com/Homebrew/install/HEAD/install.sh)"
   ```
3. Follow the prompts on the screen to complete the installation.

### Step 2: Install Python

Crew.ai requires Python 3.7 or higher. You can install Python via Homebrew:

1. In the terminal, enter the following command and press Enter:
   ```bash
   brew install python
   ```
2. After installation, you can verify if Python was installed successfully by entering the following command:
   ```bash
   python3 --version
   ```
   If it shows Python 3.x.x, it means the installation was successful.

### Step 3: Use pip to Install Crew.ai

pip is Python's package management tool that helps you install and manage Python packages. Here are the steps to install Crew.ai using pip:

1. In the terminal, enter the following command and press Enter:
   ```bash
   pip3 install crewai
   ```
2. After installation, you can verify if Crew.ai was installed successfully by entering the following command:
   ```bash
   crewai --version
   ```
   If it shows the version number of Crew.ai, it means the installation was successful.

### Step 4: Verify Installation

To ensure that Crew.ai is correctly installed and can run normally, you can try starting Crew.ai and running a simple task:

1. In the terminal, enter the following command to start Crew.ai:
   ```bash
   crewai
   ```
2. If Crew.ai starts successfully and displays a welcome screen, it means the installation was successful.

## Common Issues and Solutions

During the installation process, you may encounter some issues. Here are some common problems and their solutions:

1. **Homebrew Installation Failed**:
   - **Problem**: Unstable network connection or permission issues may lead to Homebrew installation failure.
   - **Solution**: Ensure your network connection is stable and try reinstalling using the `sudo` command.

2. **Python Version Incompatibility**:
   - **Problem**: Crew.ai requires Python 3.7 or higher, and if your system's default Python version is lower, it may cause installation failure.
   - **Solution**: Use `brew install python` to install the latest version of Python and ensure you use the `python3` command in the terminal.

3. **pip Installation Failed**:
   - **Problem**: pip installation may encounter dependency issues or network problems.
   - **Solution**: Try updating pip using `pip3 install --upgrade pip` and then reinstall Crew.ai.

## Usage Guide

After successfully installing Crew.ai, you can start using it to automate your tasks. Here are some basic function introductions:

1. **Start Crew.ai**:
   - Enter the command `crewai` in the terminal to start Crew.ai.

2. **Create Tasks**:
   - Use Crew.ai's interface to create new automation tasks, set task parameters, and save them.

3. **Run Tasks**:
   - Select the created task and run it; Crew.ai will automatically execute the task and generate results.

4. **View Logs**:
   - During task execution, you can view real-time logs to understand the execution status of the task.

## Conclusion

Through this detailed guide, you have successfully installed Crew.ai on your MacBook and learned how to start and use it. Crew.ai, as a powerful automation tool, can help you simplify workflows and improve efficiency. We encourage you to try using Crew.ai and share your installation and usage experiences in the comments section.

## Call to Action

If you encounter any issues during installation or usage, feel free to visit the following resources for more assistance:
- [Crew.ai Official Documentation](https://crew.ai/docs)
- [MacBook System Requirements](https://support.apple.com/en-us/HT201686)
- [Homebrew Installation Guide](https://brew.sh/)
- [Python Official Installation Guide](https://www.python.org/downloads/)

We look forward to your feedback and sharing!
The third agent, the Content Editor, has made a grand entrance!

This is the final output draft. Compared to the previous version, it has undergone automatic review and optimization. The draft is almost ready for publication.
# How To Install Crew.ai On MacBook: A Detailed Guide

## Introduction

In today’s fast-paced work environment, automation tools have become essential for improving efficiency. Crew.ai, as a powerful automation tool, can help users simplify task processes and enhance work efficiency. As more users choose MacBook as their primary work device, understanding how to install Crew.ai on MacBook becomes particularly important. This article will provide you with a detailed installation guide to help you easily install Crew.ai and start enjoying the convenience of automation.

## Target Audience Analysis

The main audience of this article is MacBook users, especially those interested in automation tools, tech enthusiasts, developers, and business users. These users typically seek to improve work efficiency through technical tools but may encounter technical difficulties or compatibility issues during installation. This article will address these pain points by providing clear steps and solutions to ensure every user can successfully complete the installation.

## Preparation

Before starting the installation of Crew.ai, you need to ensure that your MacBook meets the following system requirements and that the necessary software is installed.

### Check MacBook System Requirements

- **Operating System**: macOS 10.15 (Catalina) or higher
- **Memory**: At least 8GB RAM
- **Storage Space**: At least 10GB of available space

### Install Necessary Software

1. **Homebrew**: Homebrew is a package manager for macOS that simplifies the software installation process.
2. **Python**: Crew.ai is developed based on Python, so Python 3.7 or higher needs to be installed.

## Installation Steps

### Step 1: Install Homebrew

Homebrew is one of the most popular package managers on macOS, helping you easily install and manage software packages. Here are the steps to install Homebrew:

1. Open Terminal.
2. Enter the following command and press Enter:
   ```bash
   /bin/bash -c "$(curl -fsSL https://raw.githubusercontent.com/Homebrew/install/HEAD/install.sh)"
   ```
3. Follow the prompts on the screen to complete the installation.

### Step 2: Install Python

Crew.ai requires Python 3.7 or higher. You can install Python via Homebrew:

1. In the terminal, enter the following command and press Enter:
   ```bash
   brew install python
   ```
2. After installation, you can verify if Python was installed successfully by entering the following command:
   ```bash
   python3 --version
   ```
   If it shows Python 3.x.x, it means the installation was successful.

### Step 3: Use pip to Install Crew.ai

pip is Python's package management tool that helps you install and manage Python packages. Here are the steps to install Crew.ai using pip:

1. In the terminal, enter the following command and press Enter:
   ```bash
   pip3 install crewai
   ```
2. After installation, you can verify if Crew.ai was installed successfully by entering the following command:
   ```bash
   crewai --version
   ```
   If it shows the version number of Crew.ai, it means the installation was successful.

### Step 4: Verify Installation

To ensure that Crew.ai is correctly installed and can run normally, you can try starting Crew.ai and running a simple task:

1. In the terminal, enter the following command to start Crew.ai:
   ```bash
   crewai
   ```
2. If Crew.ai starts successfully and displays a welcome screen, it means the installation was successful.

## Common Issues and Solutions

During the installation process, you may encounter some issues. Here are some common problems and their solutions:

1. **Homebrew Installation Failed**:
   - **Problem**: Unstable network connection or permission issues may lead to Homebrew installation failure.
   - **Solution**: Ensure your network connection is stable and try reinstalling using the `sudo` command.

2. **Python Version Incompatibility**:
   - **Problem**: Crew.ai requires Python 3.7 or higher, and if your system's default Python version is lower, it may cause installation failure.
   - **Solution**: Use `brew install python` to install the latest version of Python and ensure you use the `python3` command in the terminal.

3. **pip Installation Failed**:
   - **Problem**: pip installation may encounter dependency issues or network problems.
   - **Solution**: Try updating pip using `pip3 install --upgrade pip` and then reinstall Crew.ai.

## Usage Guide

After successfully installing Crew.ai, you can start using it to automate your tasks. Here are some basic function introductions:

1. **Start Crew.ai**:
   - Enter the command `crewai` in the terminal to start Crew.ai.

2. **Create Tasks**:
   - Use Crew.ai's interface to create new automation tasks, set task parameters, and save them.

3. **Run Tasks**:
   - Select the created task and run it; Crew.ai will automatically execute the task and generate results.

4. **View Logs**:
   - During task execution, you can view real-time logs to understand the execution status of the task.

## Conclusion

Through this detailed guide, you have successfully installed Crew.ai on your MacBook and learned how to start and use it. Crew.ai, as a powerful automation tool, can help you simplify workflows and improve efficiency. We encourage you to try using Crew.ai and share your installation and usage experiences in the comments section.

## Call to Action

If you encounter any issues during installation or usage, feel free to visit the following resources for more assistance:
- [Crew.ai Official Documentation](https://crew.ai/docs)
- [MacBook System Requirements](https://support.apple.com/en-us/HT201686)
- [Homebrew Installation Guide](https://brew.sh/)
- [Python Official Installation Guide](https://www.python.org/downloads/)

We look forward to your feedback and sharing!
Complete Python code is available by replying “Content Automation Team” to receive the Python source code.
The process has undergone many adjustments, and the version provided to you is fully operational.
Ultimate Reflection Time
Who would have thought that I could install Crew.ai on my computer, configure the LLM large model API environment, adjust the code, and run the first complete MultiAgent script in just one afternoon? It was something I would never have imagined without AI assistance.
As the temperature from the midday sun to the winter sunset gradually fades, I sit by the window of my room and look outside, feeling this thought arise:
This is the best of times, and the worst of times. But, ultimately, it is a good era.